
Pentaho Data Integration (also known as Kettle) is one of the leading open-source integration solutions. With PDI/Kettle, you can take data from many sources, transform it in a particular way, and load it into just as many target systems.
For this tutorial, I would like to demonstrate how to convert an XML file containing category data into a Category ImpEx file using Pentaho Data Integration.
To illustrate more Pentaho capabilities and features, I decided to use a comprehensive XML structure that provides the data in an Entity-Attribute-Value (EAV) model.
<?xml version="1.0" encoding="UTF-8" standalone="no"?>
<table>
  <columns>
    <column number="1">
      <name>PRODUCT_CATEGORY_ID</name>
    </column>
    <column number="2">
      <name>NAME</name>
    </column>
    <column number="4">
      <name>PARENT_ID</name>
    </column>
  </columns>
  <rows>
    <row rowNumber="0">
      <value columnNumber="1">1</value>
      <value columnNumber="2">My Category_A</value>
      <value columnNumber="4"></value>
    </row>
    <row rowNumber="1">
      <value columnNumber="1">11</value>
      <value columnNumber="2">Category_A11</value>
      <value columnNumber="4">1</value>
    </row>
    <row rowNumber="2">
      <value columnNumber="1">12</value>
      <value columnNumber="2">Category A12</value>
      <value columnNumber="4">1</value>
    </row>
    <row rowNumber="3">
      <value columnNumber="1">2</value>
      <value columnNumber="2">Category B</value>
      <value columnNumber="4"></value>
    </row>
    <row rowNumber="2">
      <value columnNumber="1">22</value>
      <value columnNumber="2">Category A22</value>
      <value columnNumber="4">2</value>
    </row>
  </rows>
</table>
The target format is ImpEx. For the XML above, the following result is expected:
$productCatalog=Default
"$catalogVersion=catalogversion(catalog(id[default=$productCatalog]),version[default='Online'])[unique=true,default=$productCatalog:Online]";;;;;
"$lang=en";;;;;
"INSERT_UPDATE Category";"code[unique=true]";"supercategories(code, $catalogVersion)";"name[lang=$lang]";"$catalogVersion";"allowedPrincipals(uid)[default='customergroup']"
;"H_ROOT";;"Root Category";;
;"H_1";"H_ROOT";"My Category_A";;
;"H_11";"H_1";"Category_A11";;
;"H_22";"H_2";"Category A22";;
;"H_2";"H_ROOT";"Category B";;
Please note that category IDs begin with “H_”. This change is optional and is used here to demonstrate Pentaho’s Value Mapper capabilities. In real projects, converting IDs is also important, but the algorithm may be more complex.
Root nodes are represented by empty values in XML. In the target format, we need to put them under one root node: let’s call it H_ROOT.
After applying this ImpEx, hybris creates a category tree:
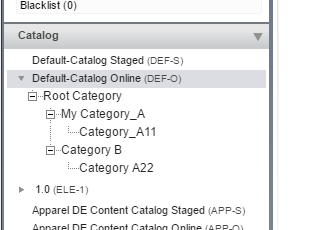
Our goal is to transform the original XML into this ImpEx file. In the previous article, I showed how this can be implemented without using any off-the-shelf software. Today I am going to tell you about an alternative solution. This solution is a configuration for Pentaho, a data integration platform.
Pentaho configuration
Let’s start at the end and look at the final result. In this tutorial, we’ll build the following process:
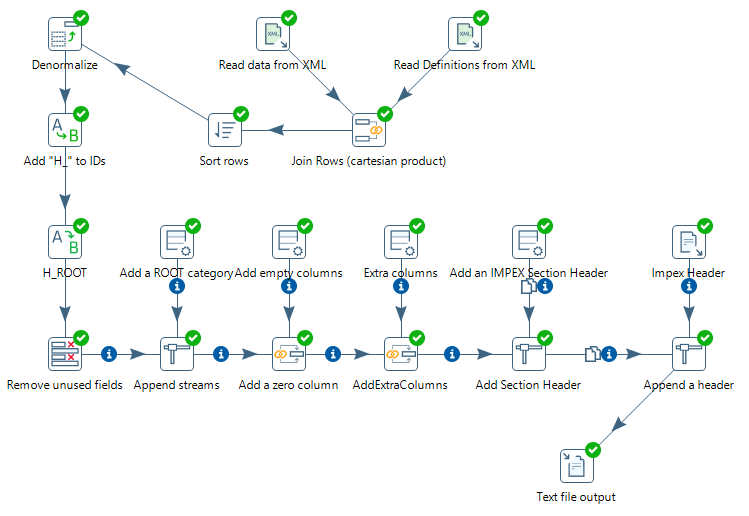
The process consists of 19 steps. After each step, I include a table with the results of that step.
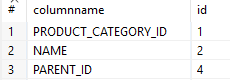
Read definitions from XML. Reads column names and their codes.
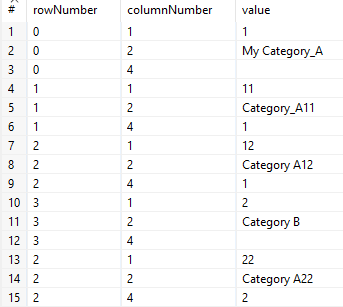
Read values from XML. Reads column values. This part of XML doesn’t contain the column names, only their IDs. So the next phase is to join them together.
Join Rows. The two previous datasets are joined on id=columnNumber.
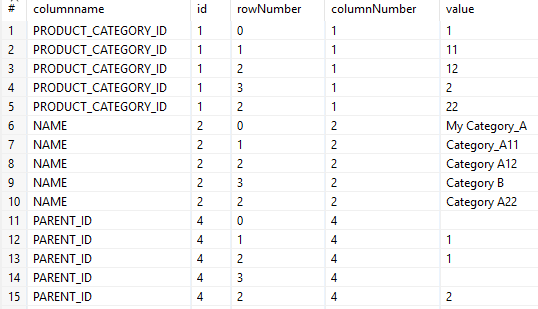
Sort rows. Sorts by
rowNumber.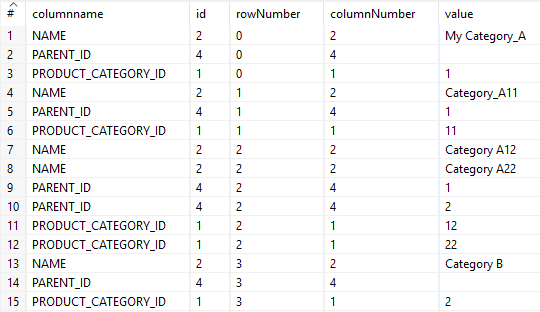
Denormalize. Pentaho creates additional columns (
PARENT_ID,PRODUCT_CATEGORY_ID,NAME) using the values of the field “value”.
Convert IDs into hybris IDs. According to the task, we add “H_” to the original ID.

Convert root nodes to H_ROOT.

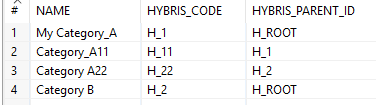
Remove unused fields (columns).
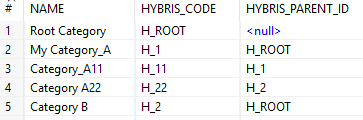
Append a Root category:
First, create a root category.

Merge it with the data from the dataset retrieved from the XML file.
Add a column at the beginning.
Add a zero column with no value.
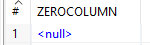
Join it into the dataset retrieved from the XML file.
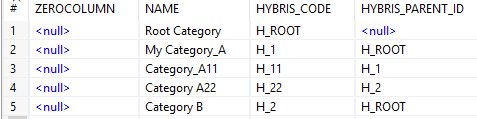
Add a couple of extra fields.
Prepare an object with these columns.

Join them into the dataset from the previous step.

Add an ImpEx Section Header.
Prepare an ImpEx Section Header.

Merge it with the data from the previous step.

Apply a template from the external text file. Basically, the template defines an ImpEx header:
Prepare a template.

Merge this header into the dataset from the previous step.

Convert these data into a CSV file.
Read definitions from XML
This step provides the ability to read data from any type of XML file using XPath specifications. It uses DOM parsers that require in-memory processing, and even purging parts of the file is not sufficient when those parts are very large. If you need to process huge files, Pentaho has another XML parsing component: XML Input Stream (StAX).
There are three main tabs:
- File
- Content
- Fields
File. The filename is stored as a project parameter, so I referenced the variable by its name instead of using the filename directly.
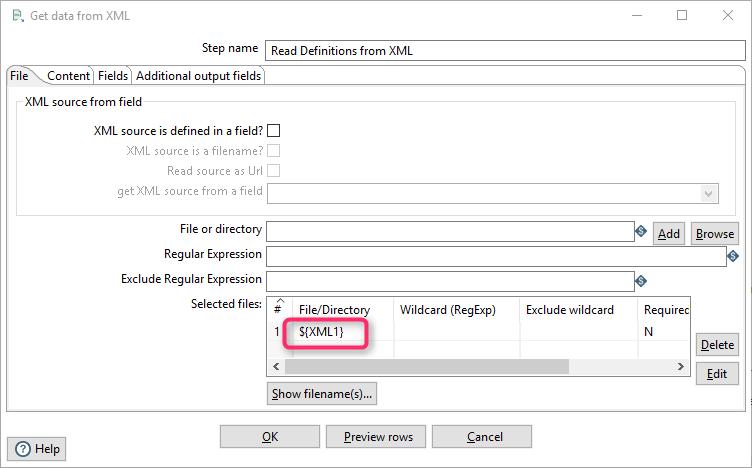
XML1 is a constant defined in the project configuration. You can also use a filename instead of the variable reference.
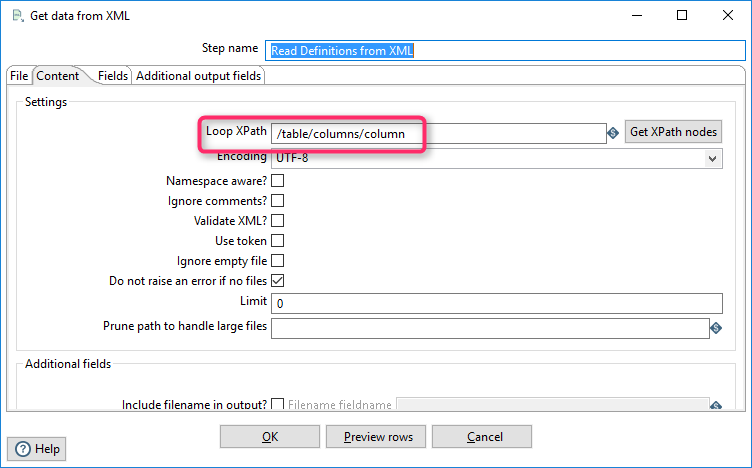
Content. The “Loop XPath” defines a root node for processing. This job processes the headers, so I filter the header section (see the XML above).
Fields. This section defines which XML tag or attribute values should be mapped to which fields. The rules below say: put the value from the name tag into the first column, called columnname, and the value of the attribute into the variable id.
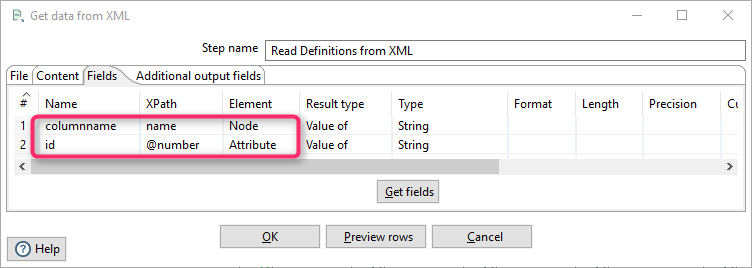
As a result, we have a list of category attributes and their codes:
Read data from XML
It uses the same component, but with a slightly different configuration:
XPath is:
/table/rows/row/*Field configuration:
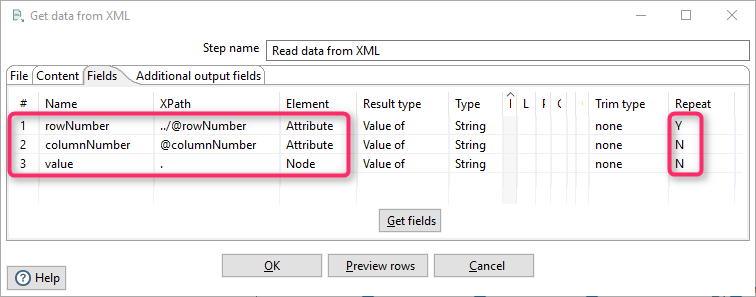
The resulting set looks like this:
For some categories, there is no parent category, so the values of attribute #4 (PARENT_ID) are empty for them.
Join Rows
For this task, I used the component “Joins/Join Rows (cartesian product)”.
At this step, the two previous sets are merged into one. The join condition is:
id=columnnumberBoth fields mean the same thing: a field name ID.
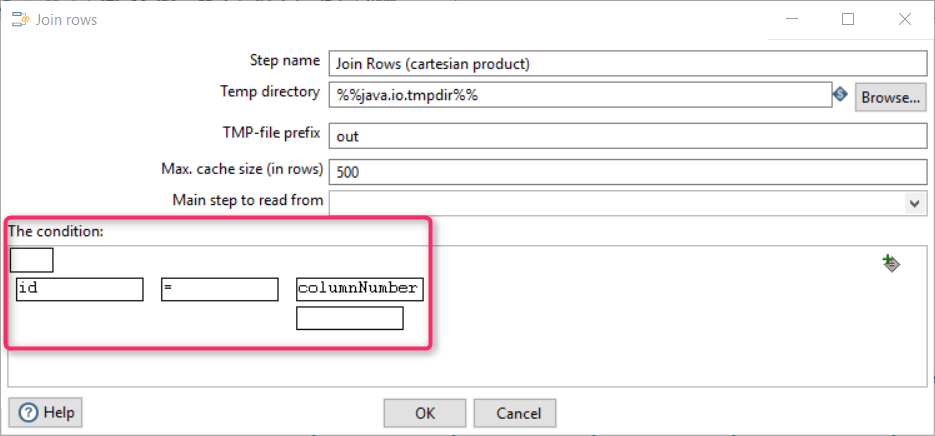
The resulting table is:
Sorting rows
To prepare for Denormalization, we need to sort rows by rowNumber, which puts the attributes related to the same category together.
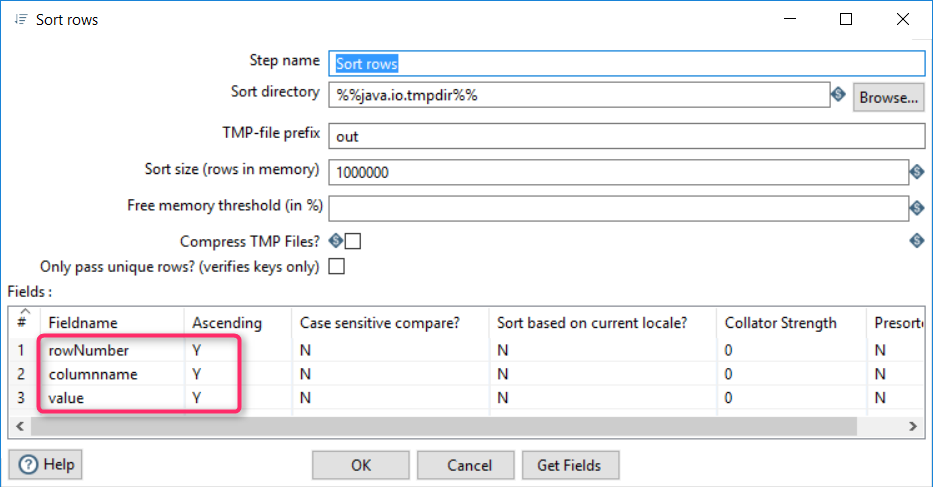
The result:
Denormalization
This component converts EAV data into fields, one per EAV attribute.
There are three things we need to configure:
- Key field, the field from the source table that contains the name of the attribute
- Group field, a source category unique ID in our case
- Target fields, mapping rules for each attribute used in the key field values
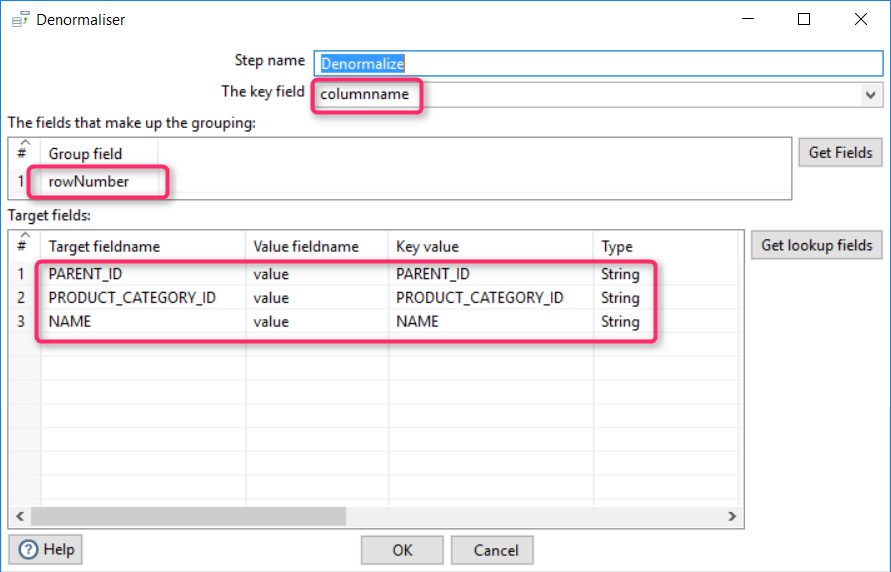
The resulting set is:
Converting IDs into hybris IDs
According to the task, we add “H_” to the original ID. I used a component called “Transform/Replace in String” and regular expressions. Two new fields are created: HYBRIS_CODE and HYBRIS_PARENT_ID.
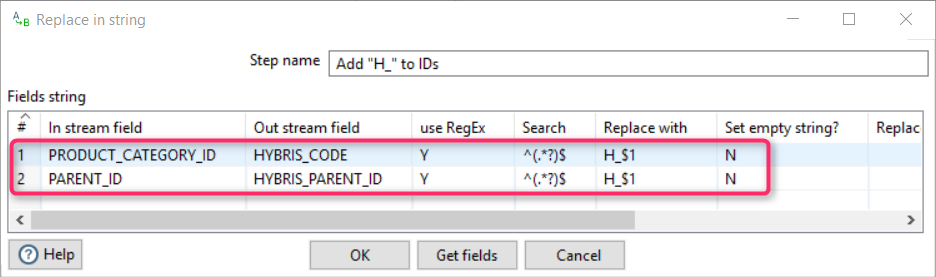
The result:
Converting root nodes to H_ROOT
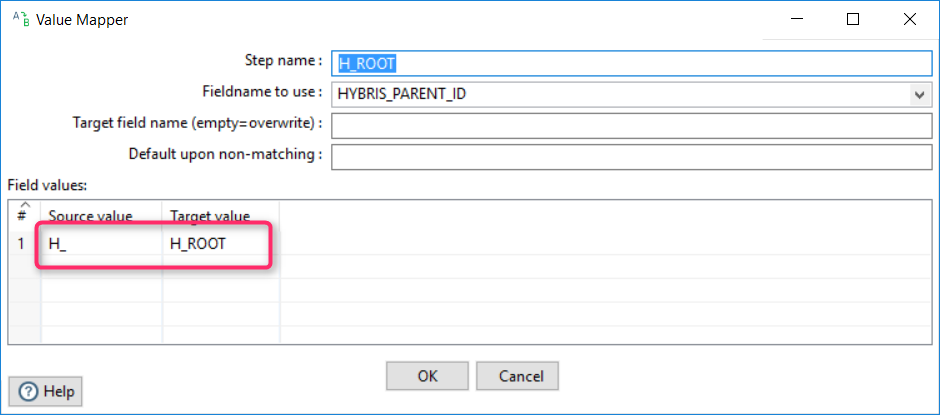
Remove unused fields (columns)
Some fields are no longer used and should be removed from the output. I used the component “Select/Rename values” for this task.
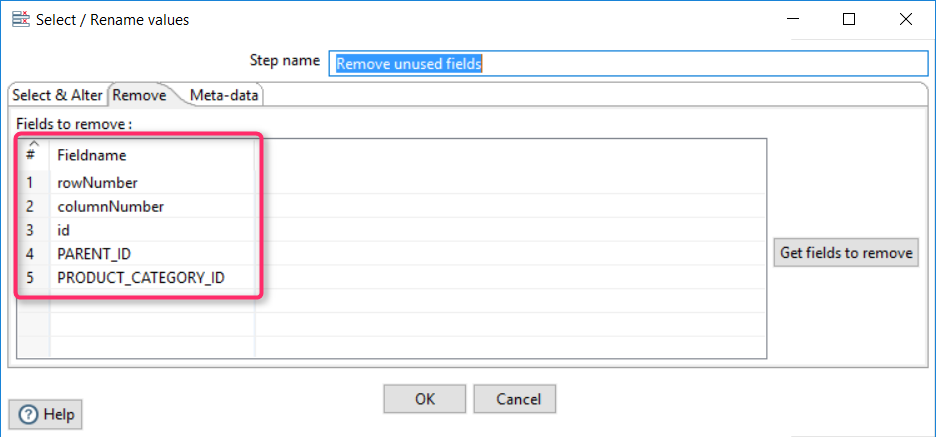
After this operation, the resulting set looks like this:
Append a Root category
According to the task statement, we need to add a virtual category, ROOT, and move all categories under ROOT in the tree. I used the component “Input/Generate Rows”.
Creating a ROOT category
First, we need to create a root category as a separate set:
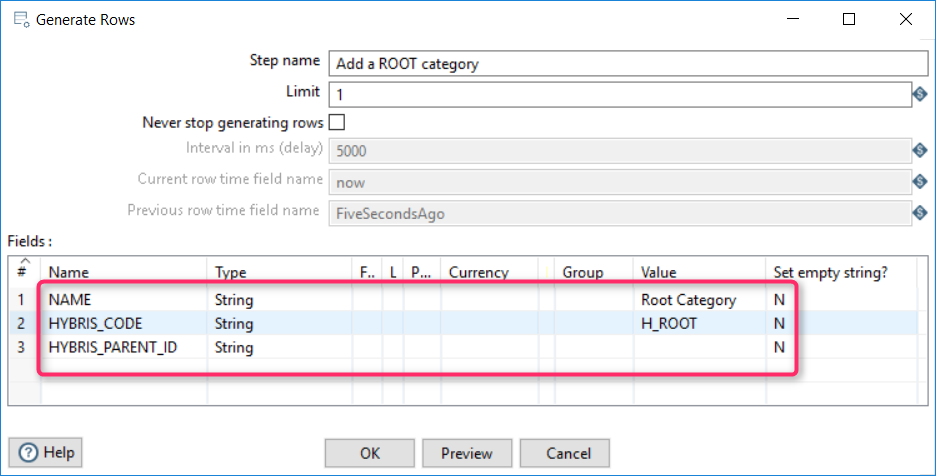
As a result, the following set is created:
Merging ROOT into the original dataset
To merge it into the original dataset, the Pentaho component “Flow/Append streams” is used.
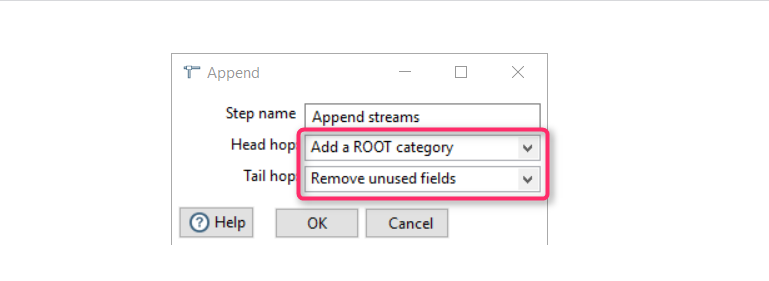
As a result, Root Category is added at the beginning of the list:
Add a column at the beginning
In the resulting ImpEx file, all data starts from the second column. The first column is used for commands and ImpEx variables. “Input/Generate rows” is also used here.
Adding an empty column
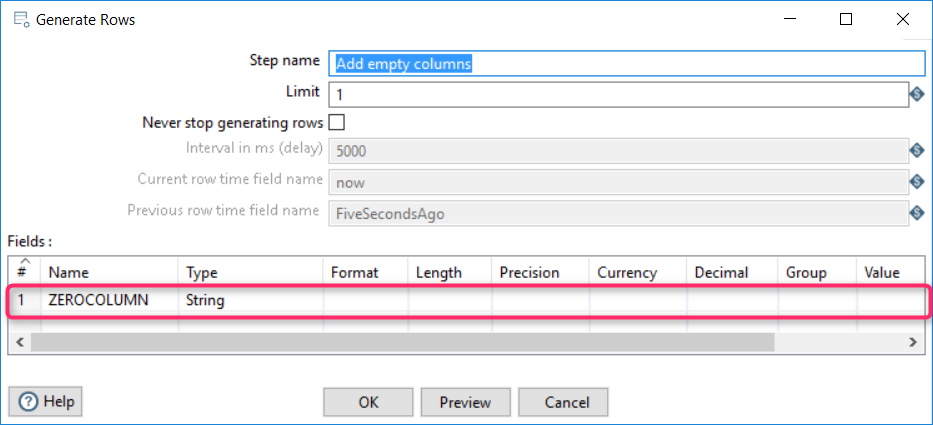
As a result, a very simple dataset is created:
Joining the empty column
Joining the empty column created in the previous step to the original dataset:
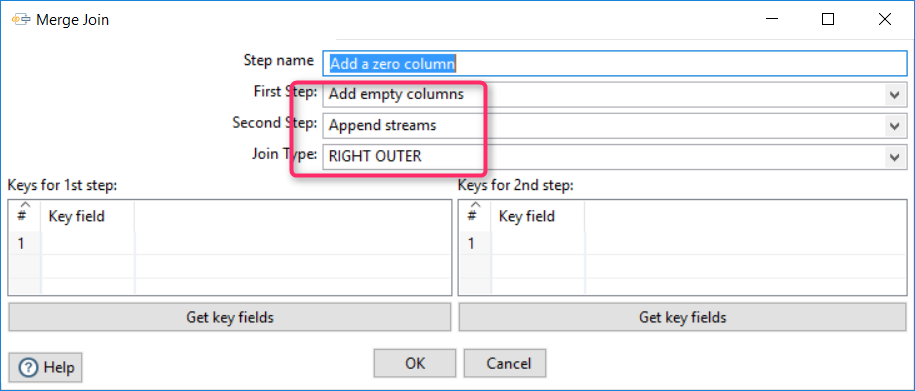
As a result, an empty column is added at the beginning:
Add a couple of extra fields
The same exercise is done for the CATALOGVERSION and PERMISSION columns. The only difference between this step and the previous one is the position of the pair in the resulting dataset. We are going to add it at the end. “Input/Generate rows” is used again.
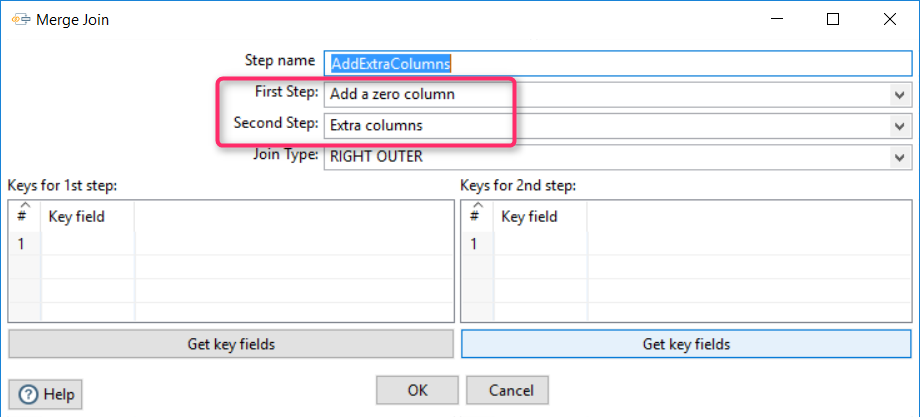
We prepared an object with these columns:
We joined this pair into the dataset.
Add an ImpEx Section Header
Similar to adding a ROOT category, we create an ImpEx Section Header using “Import/Generate rows”.
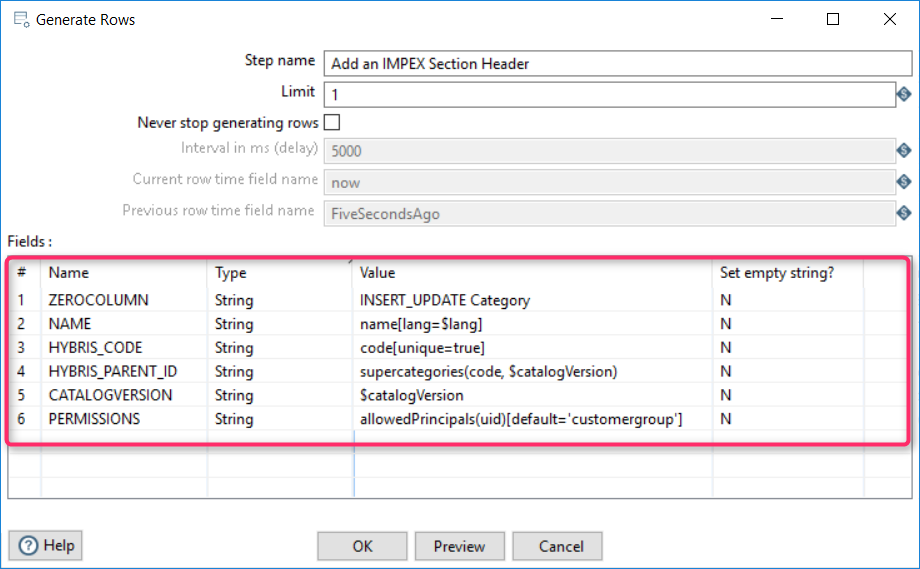
The ImpEx Section Header is prepared.
The data from the previous step is merged with the header:
Apply a template from the external text file
To avoid repeating the steps for each new line in the ImpEx, I used a component called “Input/CSV Input” to get the template from disk. The template contains variable definitions and constants.
The following template defines an ImpEx header:
$productCatalog=testCatalog
$catalogVersion=catalogversion(catalog(id[default=$productCatalog]),version[default='Online'])[unique=true,default=$productCatalog:Online]
$lang=en
Prepare a template
I use the global variable CATEGORIES_TEMPLATE. It is important that Lazy conversion must be off.
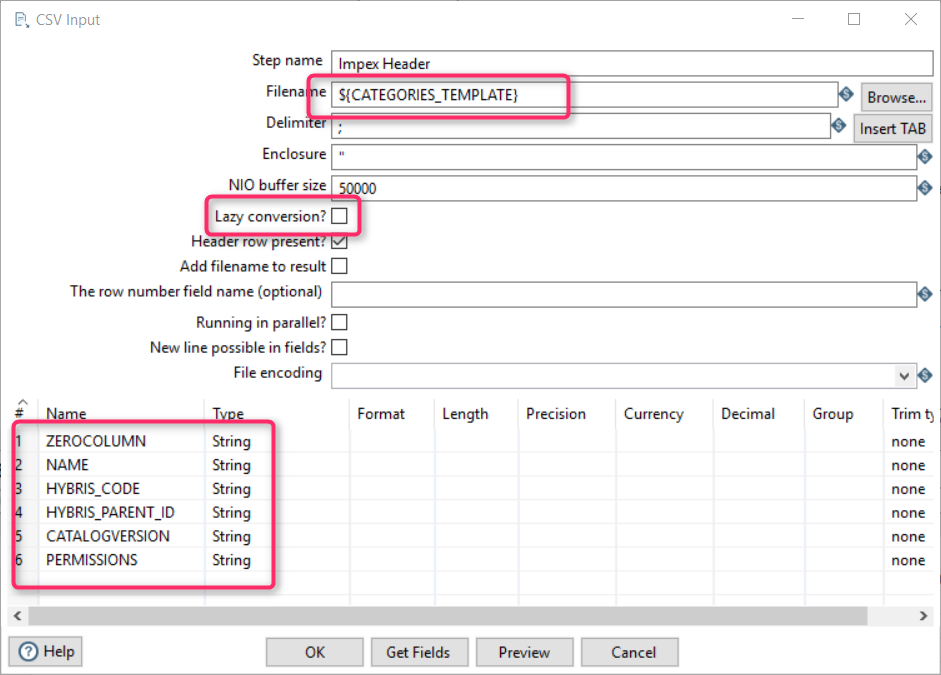
Merging this header and the dataset
As a result, the header is created. “Transformation/Append streams” is used to concatenate datasets:
Convert these data into a CSV file
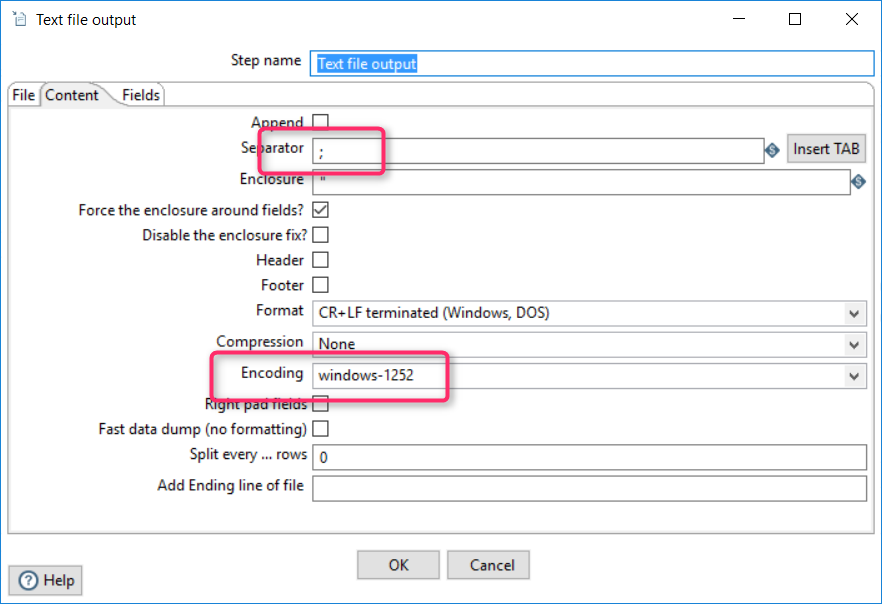
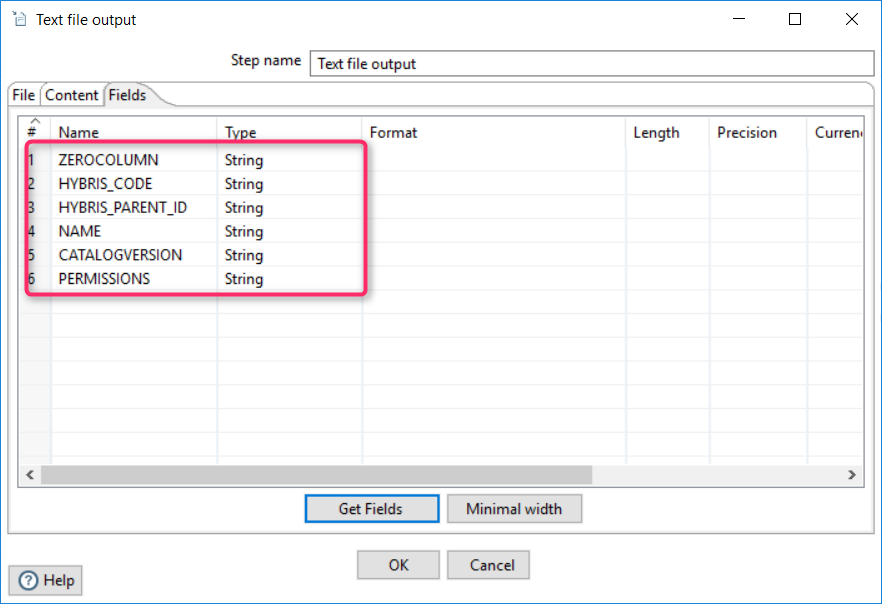
The last step is exporting the dataset into the CSV file. The component “Output/Text file output” is used here.
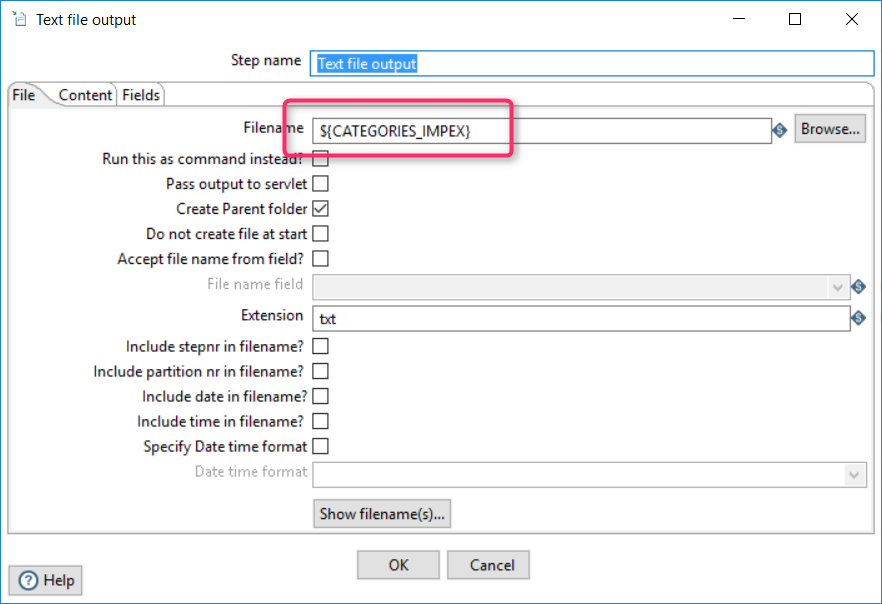
You can change the encoding and separator according to your preferences and ImpEx configuration:
Executing from the command line
Pentaho has a command-line utility called pan (pan.bat / pan.sh) that allows you to execute transformations from a terminal window.
To execute the transformation process explained above, use the simplest command:
Pan /file CSVToImpex.ktr /norep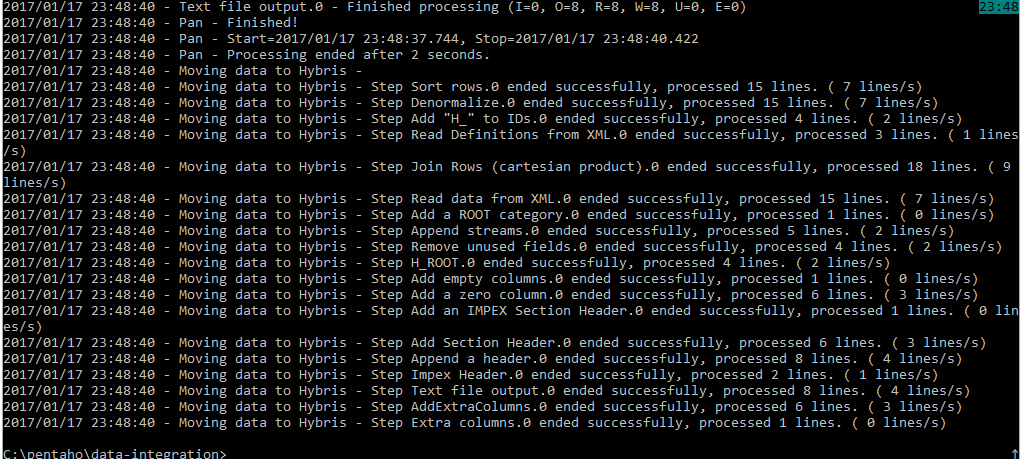
Discussion
Powered by GitHub Discussions — sign in with a GitHub account to join the conversation.