
This past weekend, I quickly drafted a utility that could be useful to some of you. It has a somewhat unusual purpose: to view and compare filesystem snapshots (ls -lR, dir /S, or find .) from different computers, and to prepare a script for synchronizing them with each other or for creating an archive with selected files from that snapshot.
Technically, this was my second attempt. About 20–25 years ago, I wrote a small program in Turbo Pascal for MS-DOS for the very same purpose. Understandably, none of that work has survived. Then, over the past weekend, I found myself needing something similar. After a quick Google search turned up nothing ready-made, I thought: why not delve into the somewhat unfamiliar territory of Python/Qt and recreate it? So, after two days of coding, I have a new tool to discuss in this article.
The name fsdumpviewer came to me while I was setting up the repository. It stands for File System Dump Viewer, which sounds quite geeky, even daunting and off-putting at the same time. But in essence, it’s a simple thing. It allows you to open and visualize files containing file hierarchies, complete with sizes, creation dates, and other metadata, including checksums, for example.
Use cases?
Let’s imagine that your colleague at home has a bulky platform distribution, and you have one as well. Let’s assume this is an SAP Commerce platform, since you are reading this on Hybrismart, but things may happen with literally anything. Everything works fine on your end, but not on theirs. This raises a suspicion that something might have broken within the distribution itself or the environment, which is supposed to be the same. It’s not the code in the repository, which is, of course, identical for both of you. Rather, it might be the platform which, although ostensibly the same version, may have had something accidentally deleted, something added, or a configuration inadvertently altered. There might even be a discrepancy in the minor versions.
The straightforward approach is to create a huge zip file and send it to your colleague. Everything is great, but even if things start working with the new platform, you may miss the root cause.
If only there were a way to easily compare files on your computer and your friend’s computer, and create an archive of just the differing files while preserving the file hierarchy. And if the differences are significant for some reason, provide your friend with the option to select only those files they would like to restore to their system, exactly as they are on yours.
In reality, this is just one of the use cases for my utility. Let’s take a look at what it can do.
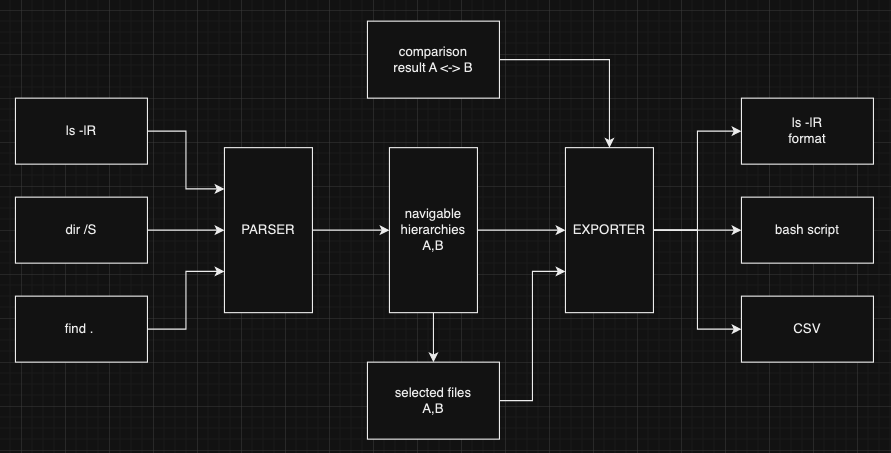
The app can transform the output of traditional directory listing commands — ls -lR on Linux and macOS, or dir /S on Windows — into an interactive tree representation of folders and files, in the left or right panel, similar to the way Midnight Commander / FAR Manager (or, if you are as old as I am, DOS Navigator and Norton Commander) visualize the file system. This visualization not only enhances readability but also enables users to perform comprehensive comparisons between two directory snapshots.
As demonstrated in the accompanying screenshot below, my app presents both directory trees side by side. Users can easily contrast the two, with discrepancies between them prominently highlighted. Such differences could include varying file sizes, modified permissions, or even new or deleted items, immediately drawing attention to potential areas of concern or interest.
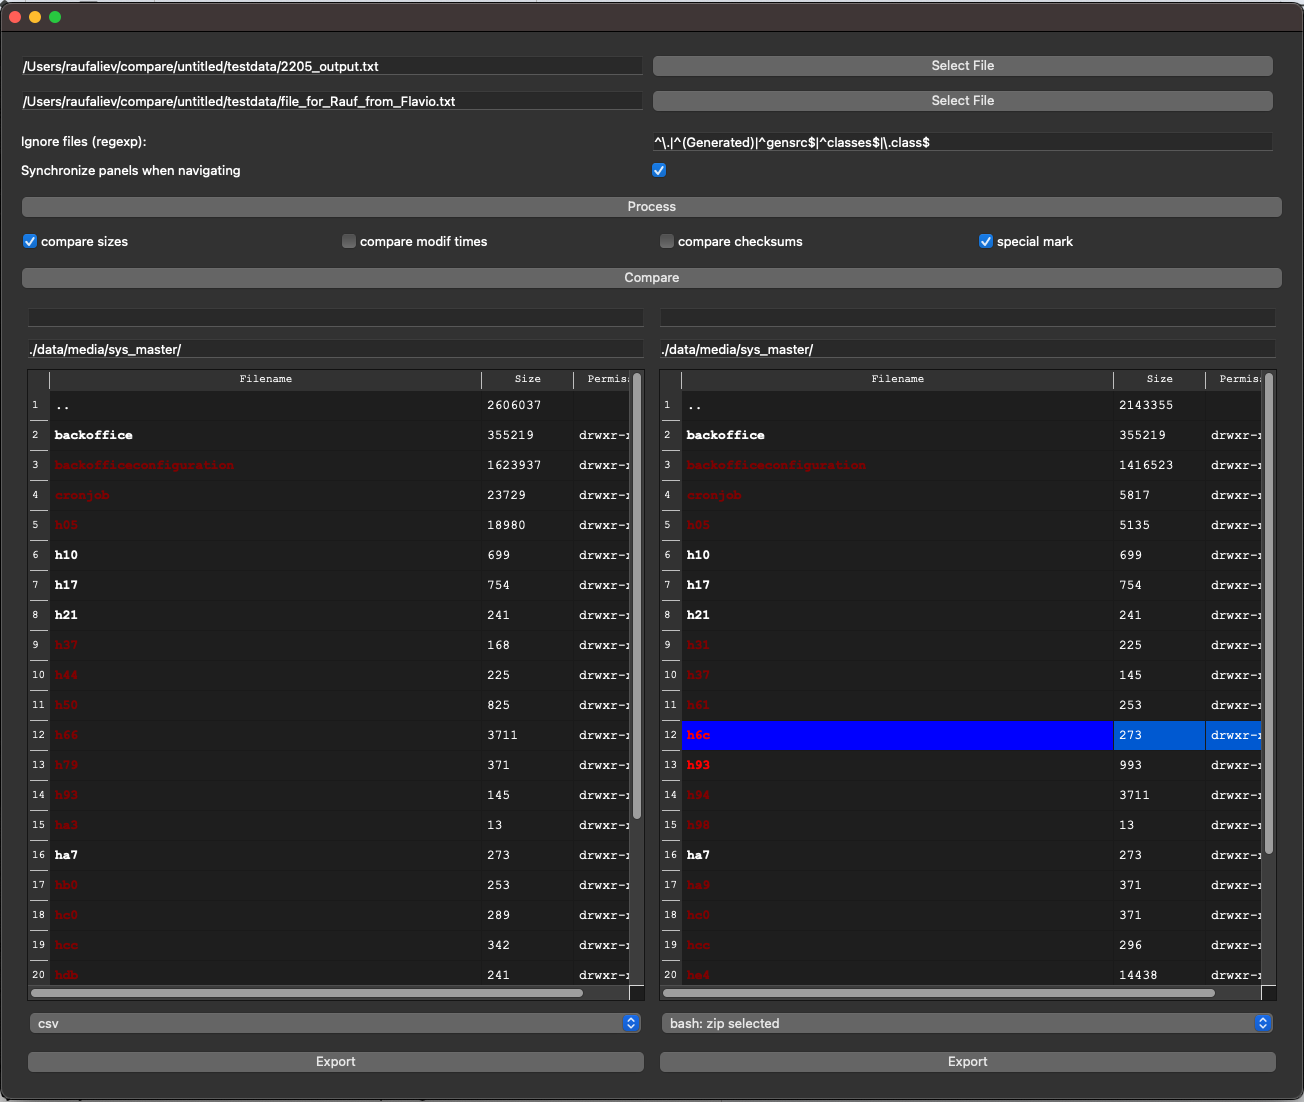
Users have the liberty to selectively mark or unmark individual folders and files, tailoring the comparison to their specific needs. Once the review is complete, the chosen files can be conveniently exported into a shell script for Bash or a batch file for Windows to collect the selected files from the folder from which the snapshot was made. These scripts are automatically populated with cp (copy) and mkdir (make directory) commands, thereby streamlining the process of archiving or transferring only the selected files. This feature is especially useful for creating targeted backups or preparing a subset of a file system for sharing.
Potential use cases for such a tool are manifold. It could serve as an asset for developers looking to synchronize project files between workstations, for system administrators tasked with maintaining the integrity of file systems, or for collaborative teams requiring a method to share only relevant files without the overhead of full directory structures. Moreover, it offers a practical solution for creating backups of only modified files, saving both time and storage space.
Everyone reminds me about rsync
Of course, rsync is not a replacement at all. First and foremost, rsync is not a GUI app. While rsync is powerful for file synchronization and transfer, it operates in a command-line environment and lacks a graphical user interface (GUI). Secondly, it requires two machines to be connected.
Creating snapshots
The tool itself doesn’t provide any way to create snapshots, simply because your operating system already has everything for that. Yes, right now it means you should know what a Terminal (macOS) or CMD (Windows) is. If you use Linux, I don’t need to explain it to you.
The following input formats are currently supported:
- Mac OS X / Linux / Windows Subsystem for Linux (WSL):
ls -lRfind . -lsfind . -type f -print0 | xargs -0 -n10 shasum -a 256
- Windows:
dir /S
The app recognizes the format automatically.
Mac OS / Linux file listing (LS)
ls -lR
The console command that provides a recursive long-format listing of all files within a directory and its subdirectories in Unix-like operating systems such as Linux and macOS. This command outputs detailed information about each file and directory, including permissions, number of links, owner, group, size, and the last-modified date.
The output of ls -lR on WSL (Linux subsystem for Windows) is slightly different from macOS’s, and it is supported too.
Example:
./apache-ant/bin:
total 144
-rwxr-xr-x@ 1 raufaliev staff 11730 Aug 2 2022 ant
-rw-r--r--@ 1 raufaliev staff 7471 Aug 2 2022 ant.bat
-rw-r--r--@ 1 raufaliev staff 2856 Aug 2 2022 ant.cmd
-rwxr-xr-x@ 1 raufaliev staff 862 Aug 2 2022 antRun
./apache-ant/etc:
total 512
-rw-r--r--@ 1 raufaliev staff 22803 Aug 2 2022 ant-bootstrap.jar
-rw-r--r--@ 1 raufaliev staff 4799 Aug 2 2022 changelog.xsl
drwxr-xr-x@ 6 raufaliev staff 192 Aug 2 2022 checkstyle
-rw-r--r--@ 1 raufaliev staff 18445 Aug 2 2022 coverage-frames.xsl
-rw-r--r--@ 1 raufaliev staff 18910 Aug 2 2022 jdepend-frames.xsl
-rw-r--r--@ 1 raufaliev staff 11735 Aug 2 2022 jdepend.xsl
Note that there is no absolute location of the files — just relative paths.
find . -ls
This command in Unix-like operating systems serves a similar purpose to ls -lR, but creates a slightly different output: one file per line.
Windows CMD file listing (DIR /S)
dir /S
The equivalent for Windows users, which also recursively lists the contents of a directory and all subdirectories, showing files and folders with attributes next to each item.
Directory of C:\Projects\miew\packages\lib\tools
10/30/2023 02:57 PM <DIR> .
10/30/2023 02:57 PM <DIR> ..
09/18/2023 02:30 PM 6,009 atom_types.csv
09/18/2023 02:30 PM 2,223 atom_types.py
10/30/2023 02:57 PM 58 babel-register-wrapper.js
09/18/2023 02:30 PM 912 config.js
09/18/2023 02:30 PM 1,728 fetch.py
 5 File(s) 10,930 bytes
Directory of C:\Projects\miew\packages\lib\vendor
09/18/2023 02:30 PM <DIR> .
09/18/2023 02:30 PM <DIR> ..
09/18/2023 02:30 PM <DIR> fonts
09/18/2023 02:30 PM <DIR> js
 0 File(s) 0 bytes
Checksums
Unlike ls -lR and dir /S, the output of the commands explained in this section includes checksums, which are used for comparing the files.
The following checksums are supported:
shasum(SHA-256)cksum(CRC)md5
The basic version of the command is:
find . -type f -print0 | xargs -0 -n10 shasum -a 256For macOS, I recommend adding a -P parameter specifying the number of parallel processes to run at one time:
find . -type f -print0 | xargs -0 -P$(sysctl -n hw.ncpu) -n10 shasum -a 256For Unix-like operating systems, use the following command:
find . -type f -print0 | xargs -0 -P$(nproc) -n10 shasum -a 256You can use cksum or md5 instead of shasum for much better performance. However, they are more prone to hash collisions.
The output produced by shasum is a hash with a length of 256 bits, which is represented by 64 characters, followed by the relative file path:
6a5410cf72028054ae644e3bf89fb3218492370dff027bf08ce756c36225355e ./data/media/sys_master/cronjob/ha1/h9a/8796160000030.zip
72268751ba282fc8fc163dc8f01d2f560c6f092b09f4f969ee0fe8d748a80d1c ./data/media/sys_master/cronjob/h55/hd9/8796159344670.zip
The md5 output has the following format:
…
MD5 (./licenses/The Werken Company License.txt) = 197f1da3d6f3f45d1c457fc9472ec405
MD5 (./licenses/Apache License, Version 2.0.txt) = 3b83ef96387f14655fc854ddc3c6bd57
MD5 (./licenses/Bouncy Castle Licence.txt) = b5e1b06e58fc6349c43742d2b95cc740
…
Example of the output for cksum:
632490982 1516 ./licenses/The Werken Company License.txt
1627374496 11358 ./licenses/Apache License, Version 2.0.txt
632113005 1126 ./licenses/Bouncy Castle Licence.txt
On my laptop, traversing the hierarchy of files inside the folder containing SAP Commerce Platform 2205 and project files, totaling 129,609 files, took:
- 1.1 minutes to create a snapshot with
cksum - 1.5 minutes to create a snapshot with
md5 - 7 minutes to create a snapshot with
shasum -a 256
Ignoring files
It is often useful to ignore some files or groups of files. This is facilitated by a regular expression, which is used to exclude files and folders.
For example, the following regexp excludes all files whose name starts with Generated, a dot, as well as gensrc, classes, and all files having a .class extension:
^\.|^(Generated)|^gensrc$|^classes$|\.class$If the app sees a .git folder, all subfolders will be ignored as well.
Comparing snapshots
You can compare two snapshots, no matter what format they were loaded from. Comparing works only when two panels are populated with file hierarchies loaded from files.
For comparison, the program goes through all the files and directories restored from the snapshot, comparing their names, sizes (if available), and checksums (if available). If a file exists only on the left, it will be highlighted there; if it exists only on the right, the right file will be highlighted. If files exist in both panels but have different sizes or checksums, they will also be highlighted. Such comparison will be performed in all folders and subfolders.
“Special mark”
What does “highlighted” mean? There are two options. If the “special mark” checkbox is unchecked, the files will be highlighted in the same way they can be manually selected — by pressing Space. That is, the comparison results can be “edited” when the “special mark” checkbox is off. This is convenient if you need to export the comparison results in full or with minor edits. If the checkbox is on, then the comparison results will exist separately from manual selection. This is handy when you need to review the comparison and choose something specific.
Exporting
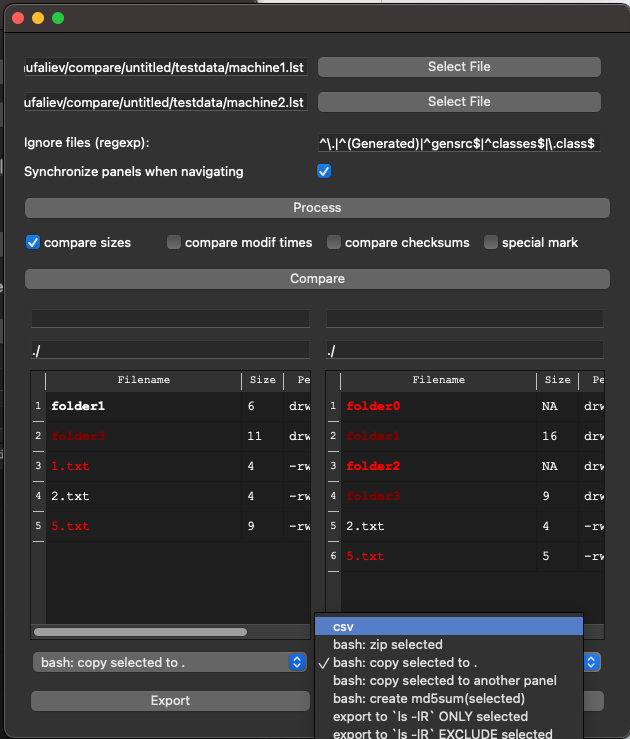
You can export the selection to one of the following formats:
- CSV — just a plain list of selected files; empty directories are not included
- a bash script creating the directories (including empty ones) and copying the files while keeping the original hierarchy
- creating a tar gz archive with all files preserving their hierarchy
- a folder with all selected files preserving their hierarchy
- a file having all the selected files in the
ls -lRformat, which can be used as an input for the app
Let’s have a look at what kind of bash script is created for the selected files.
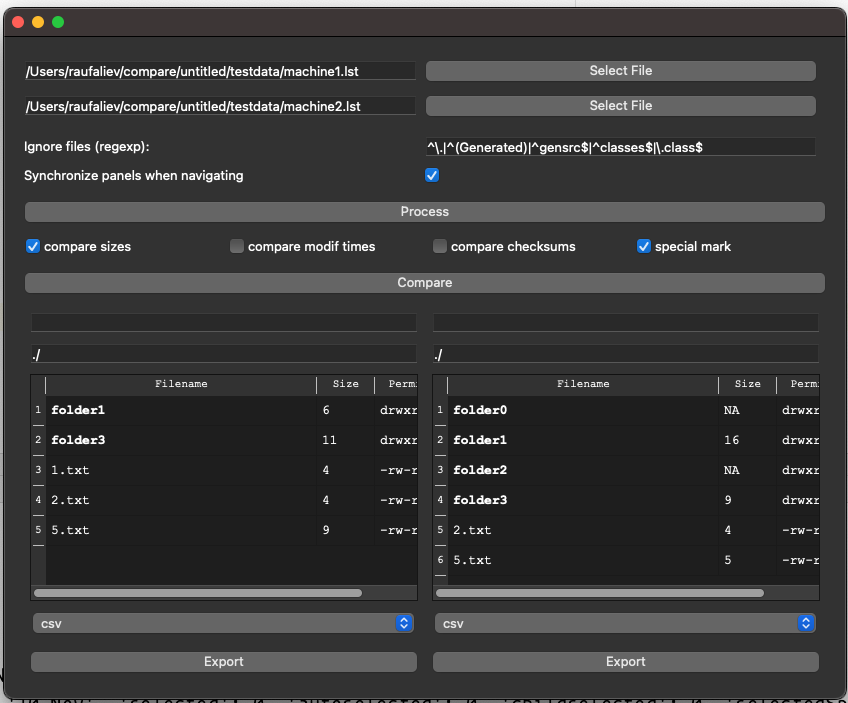
Let’s assume there are two machines, machine1 and machine2.
Both have similar hierarchies.
Here is a hierarchy for the first machine:
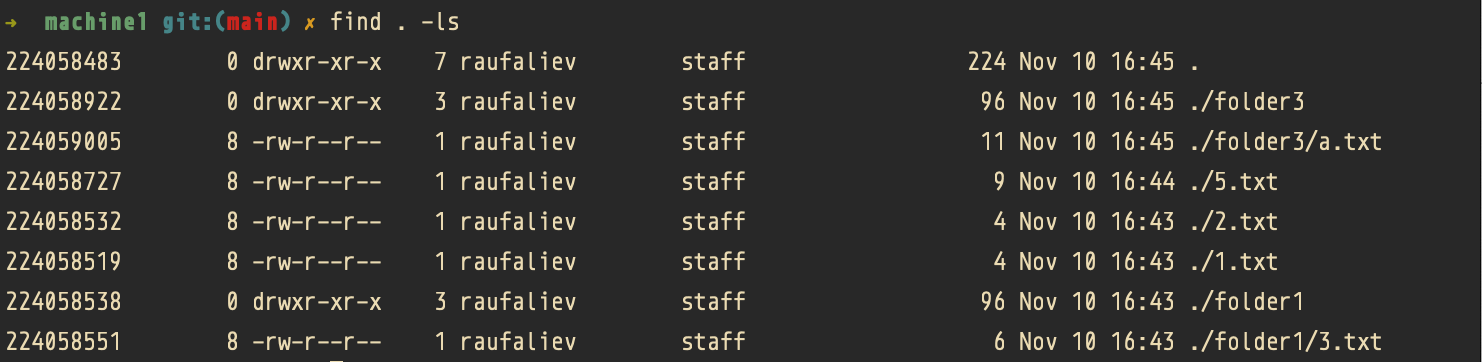
Let’s save it to machine1.lst.
And this one is for the second machine:
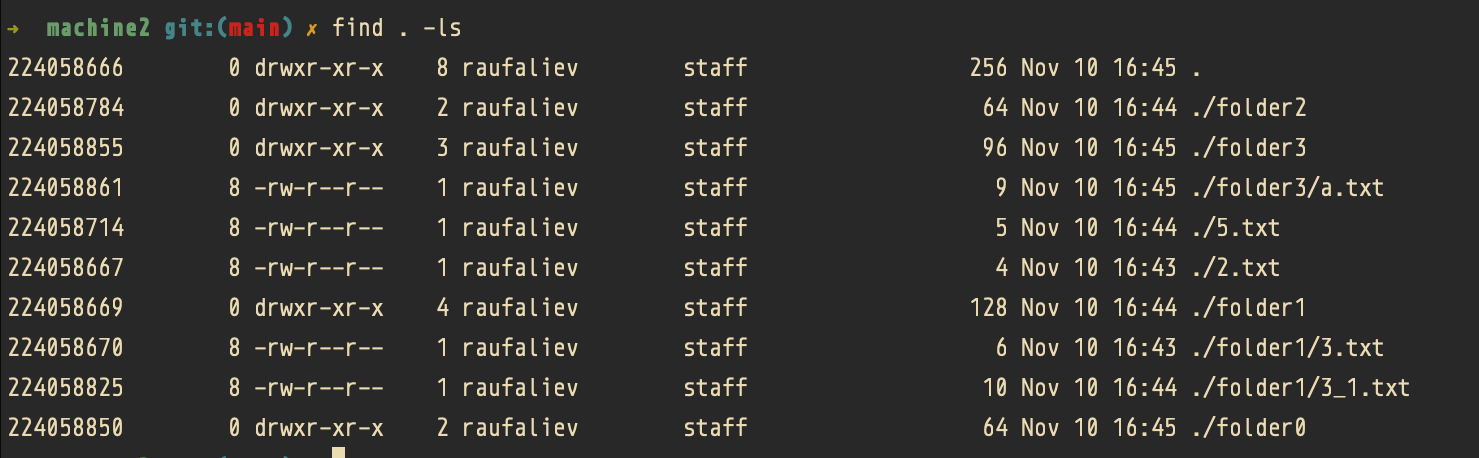
Let’s save it to machine2.lst.
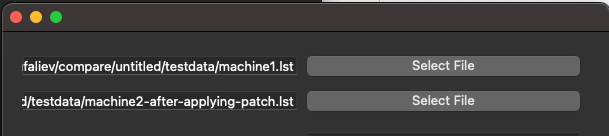
Load both to the app:

And click Process:
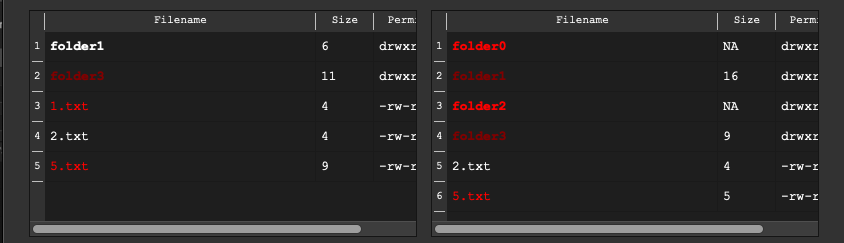
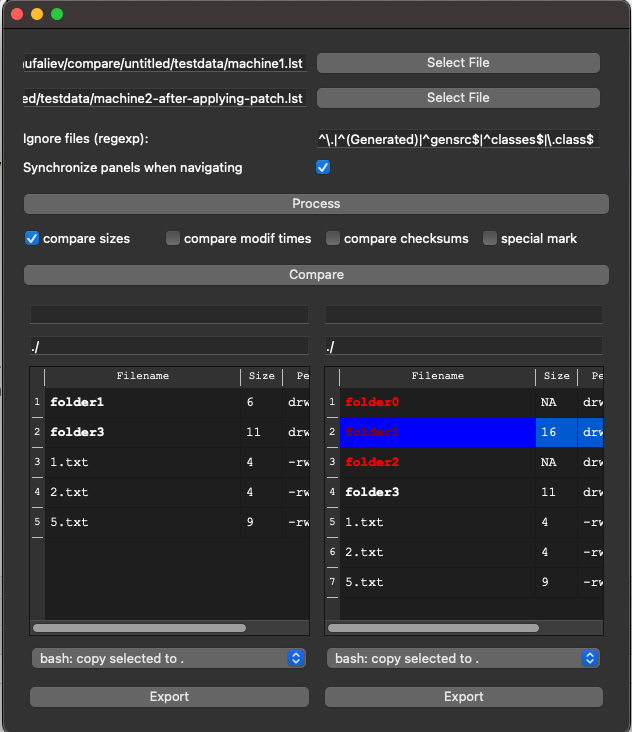
The hierarchies are clearly different; there are the same files as well. Now let’s uncheck “special mark” and export the difference to the bash file.
After clicking “Compare,” some files are highlighted and some are not. 2.txt is not highlighted because it is the same in both snapshots. folder0 and folder2 are present only on the right side. folder1 and folder3 are selected, but they are not bright because the changes are inside this part of the file tree, not in the folders themselves.
(Don’t forget to uncheck “special mark” before comparing. Otherwise, your files won’t be selected for export automatically. See the “Comparing snapshots” section for the explanation why.)
Let’s open folder1:

Here we see that there is a new file on the right side. 3.txt is the same.
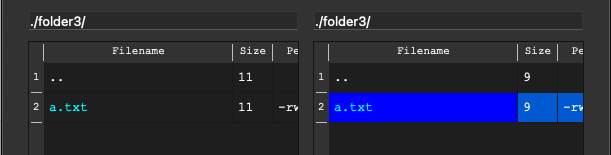
Let’s open folder3. Both snapshots have a.txt, but the sizes are different.
Now let’s export the bash script from the left panel:
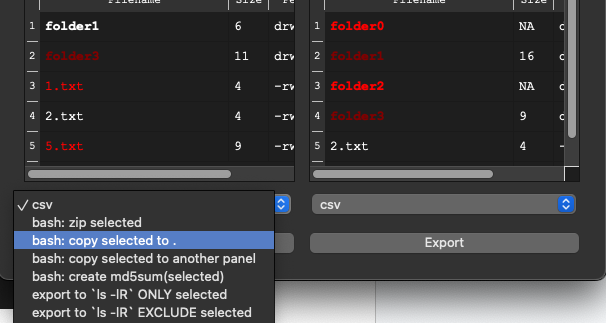
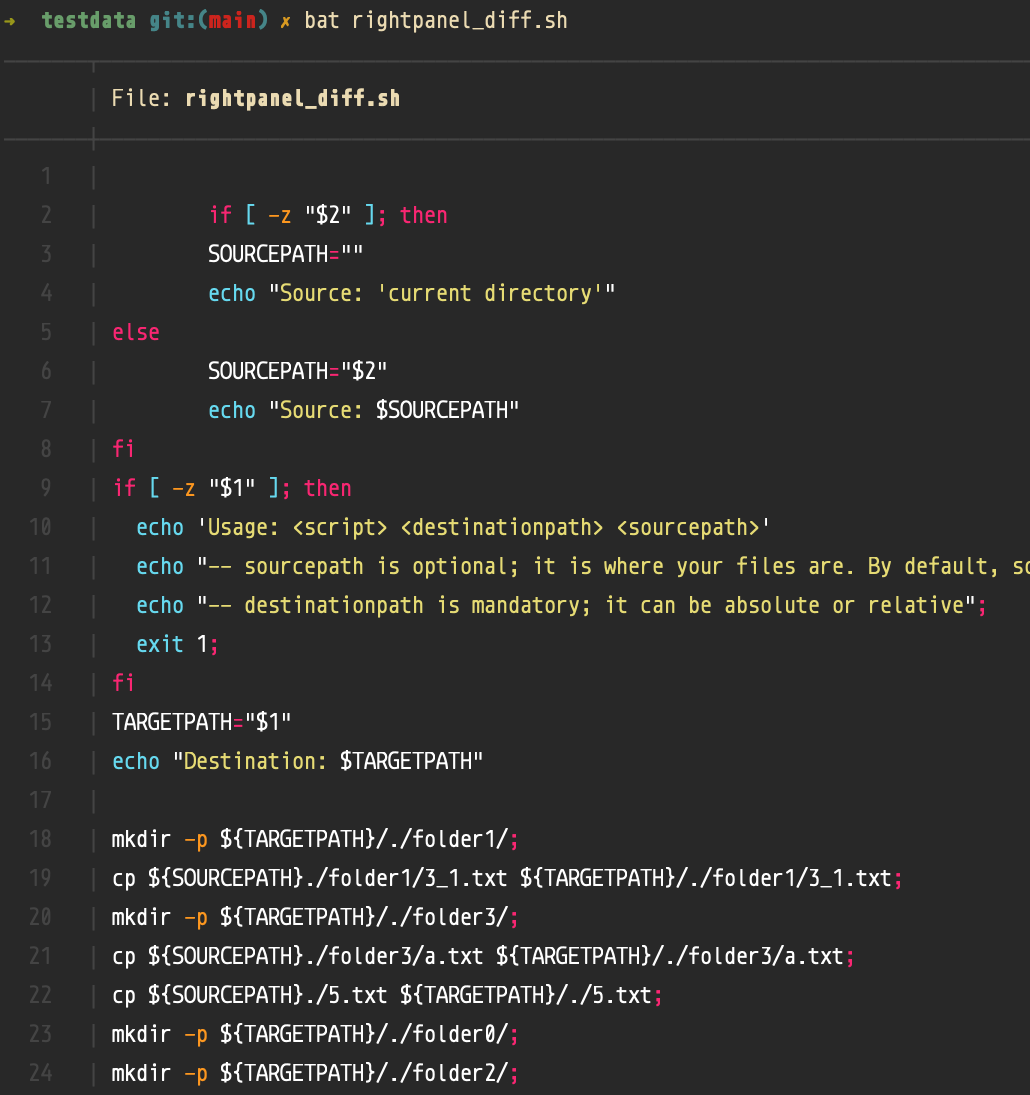
The system generated the following script:
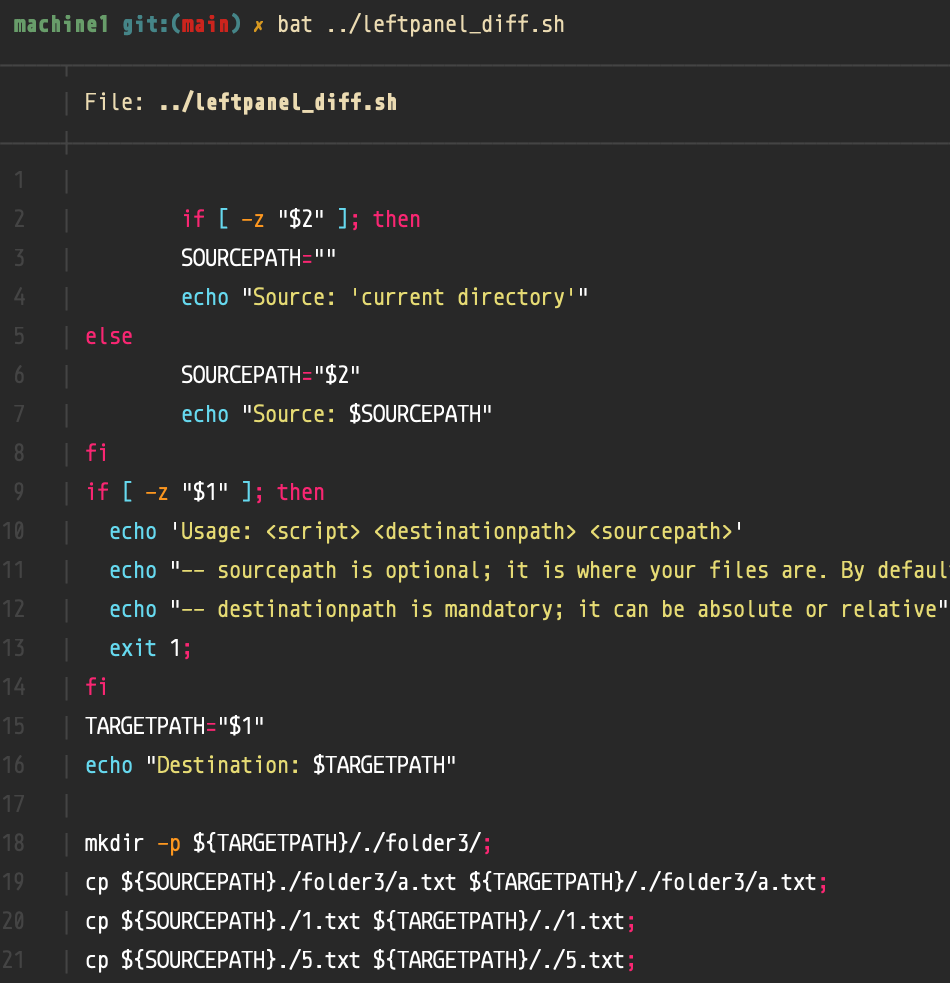
As we see, it prepares 1.txt, 5.txt, and folder3/a.txt for machine2.
If we send this script to someone who has the file system from which the first snapshot was made, and run it with two parameters, source and target folder, the source folder by default is the current directory.

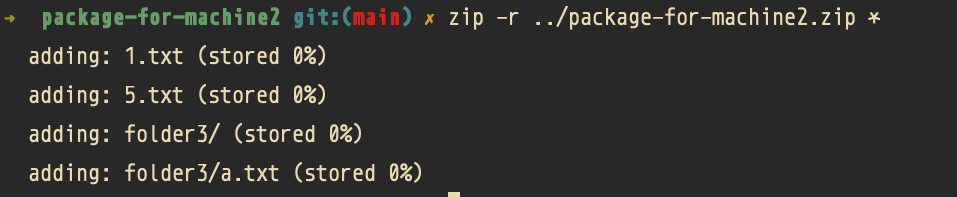
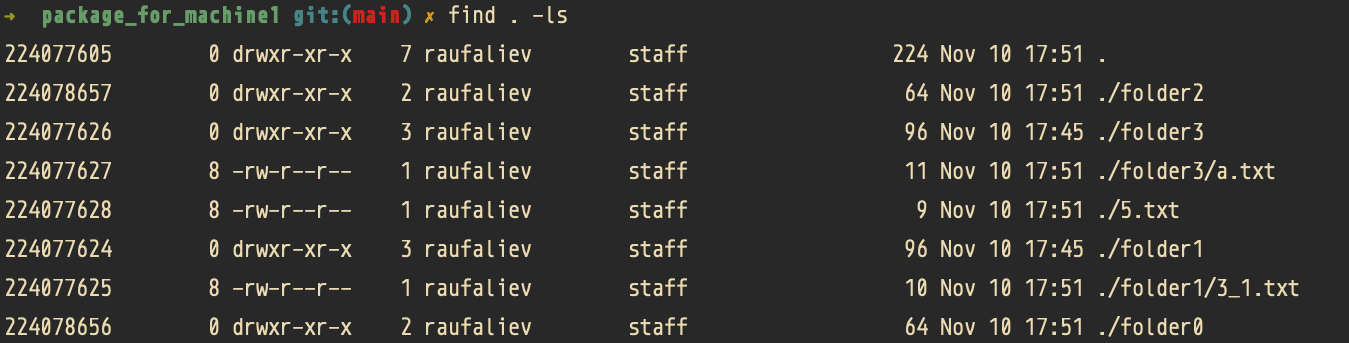
We see that the folder package-for-machine2 now contains only new and different files.
This folder can be zipped and sent to the person who owns machine2.
Now the owner of machine2 can unzip it.

If we create a listing from machine2 and compare it with machine1, there should not be any difference.
Let’s do that.
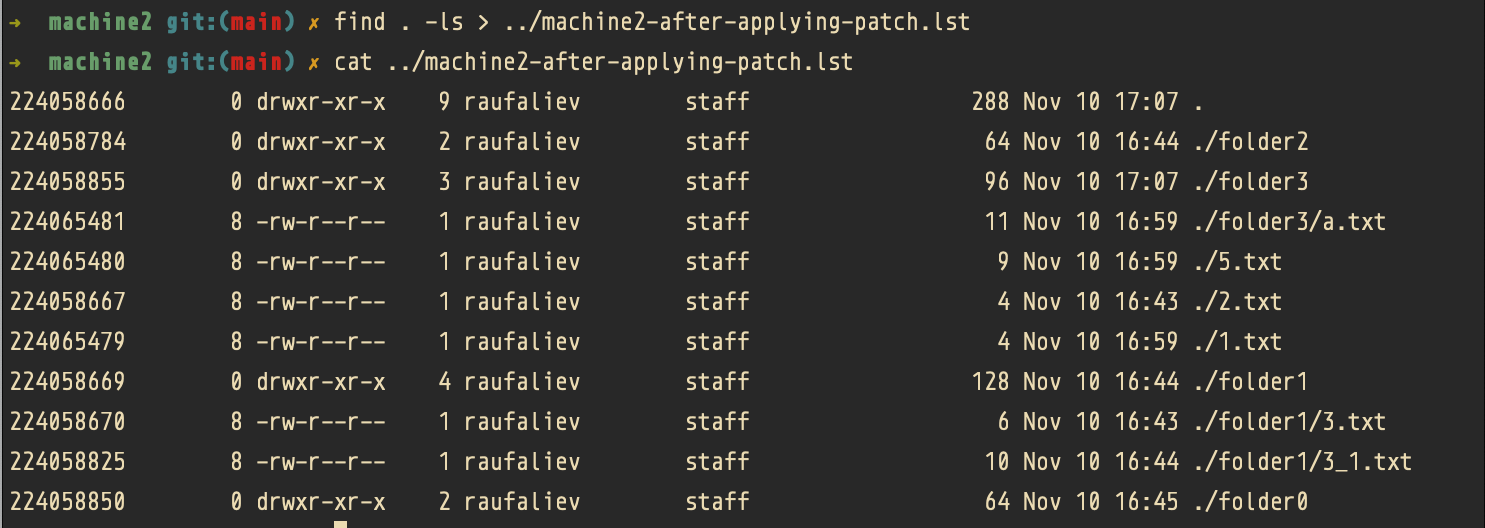
Load both to the app. The second one is now new.
Now there is no difference in the files 1.txt, 5.txt, and folder1/a.txt.
However, some difference is still there, and it is normal because machine2 had some new and changed files, and those files were not removed. Specifically, these are two empty folders, folder0 and folder2, as well as folder1/3_1.txt — all of them were not present on machine1.
Now let’s assume that the owner of machine1 wants to synchronize the files with machine2. For this purpose, we export a shell script from the right panel, not from the left panel as was done above.
Here we see that two empty folders are created and 3_1.txt is also included. The files a.txt and 5.txt were included too, because on machine1 they had different sizes:
The package now contains folder3, folder1, and 5.txt — it has a different version.
The fsdumpviewer tool can interpret these outputs and convert them into an easily understandable tree diagram that mirrors the file system. It simplifies the process of exploring intricate folder structures and facilitates the rapid detection of variations between two separate file system conditions. The visual layout allows users to engage by choosing or deselecting specific files and folders for contrast, with the software emphasizing any inconsistencies.
Github:
https://github.com/raliev/fsdumpviewer
Welcome to contribute!