

There are dozens, even hundreds, of test automation frameworks available, and we developed our own. Why? Was it worth the effort?
This article describes our needs and our solution, E2E CLI: the architecture of the API testing tool that has been used by our team for about two years. Back in 2020, I developed it from scratch over the course of a weekend. In other words, it is a very simple piece based on very simple ideas. That first version supported 80% of the functionality available today in the latest version and described below. We don’t add features without good reason.
We use this tool to end-to-end test all our services and integration flows. Whenever we make changes to a software system, we need to ensure that they do not break what was already working.
As the architect and lead developer, I designed and developed it from the ground up, so, of course, I am very proud of my brainchild. But the field cannot be seen well from within the field. You know, reinventing wheels is not always bad. When you build something on your own, you are in full control over what is being built, what its purpose will be, and when it is finally conceived and executed as you wish. It has been two years since I encountered any alternative to our solution.
To reach a wider audience, I found it beneficial to share the key concepts, hoping to get some feedback from the community and enhance the product.
Technically, the tool has nothing to do with SAP Commerce; it’s for testing. However, our entire team, which uses this tool daily, is focused mainly on SAP Commerce development. And the tool is tailored to be used with SAP Commerce.
While the client, for whose benefit the tool is being used, has authorized me to share high-level details, I cannot disclose names or code. In spite of this, the conceptual view should be useful on its own and might become a good foundation for your own solution.
What To Test?
There are a number of APIs in our landscape, and many of them are cascaded. Each layer performs some data transformation or data enrichment against the input and pushes the result to the deeper layer. The response from the deeper layer is also transformed or enriched before being sent to the requesting system, a browser, or an app orchestrating master data integration.
We needed a tool for both automated and exploratory testing.
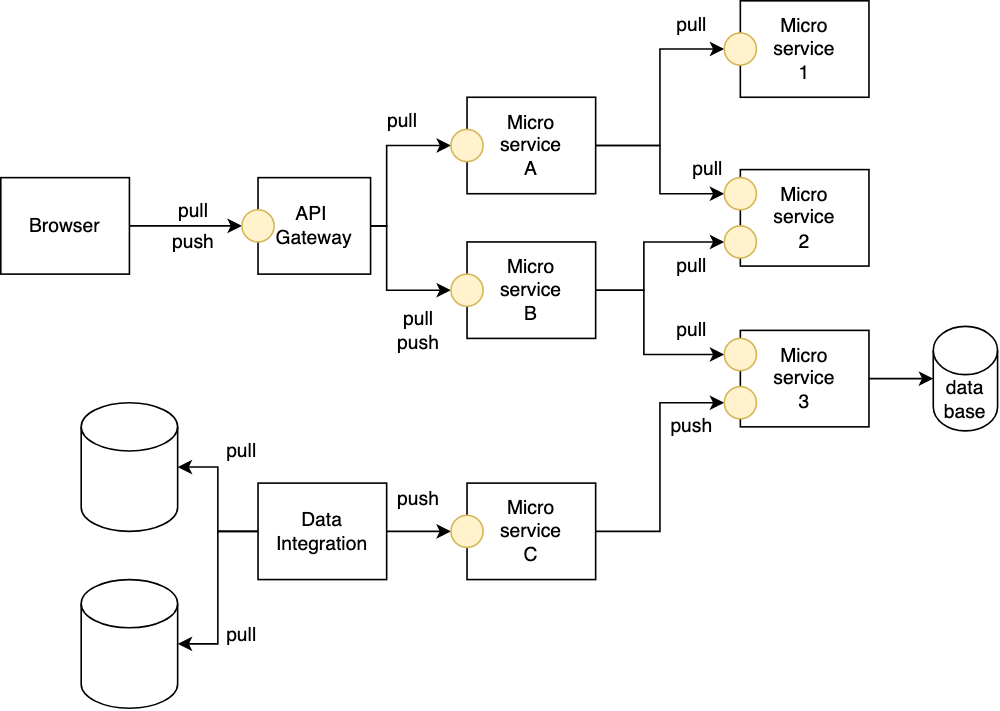
In the diagram, yellow circles represent APIs. In our setup, all of them are RESTful. Almost all of them accept and produce JSON.
Not all of the APIs are stateless. Some have their internal state persisted in the database. Not all microservices are under our control; some are legacy, so the API contract or response formats could not be changed easily, for example.
One such component is SAP Commerce.
Complications
Requirement 1. End-to-end.
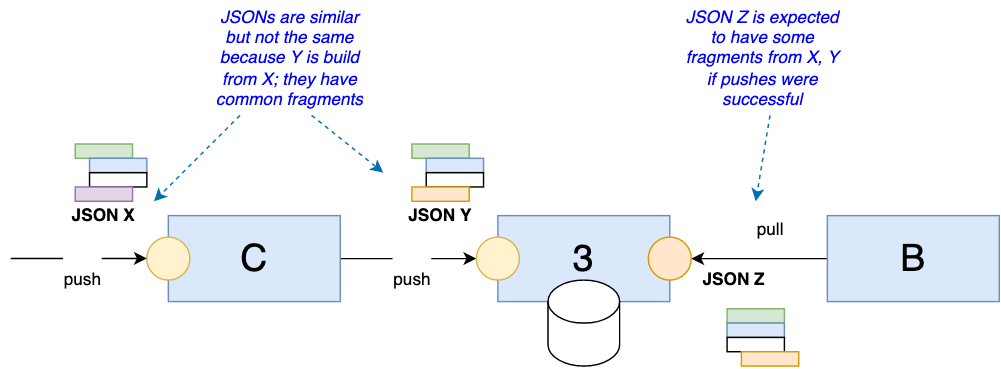
I needed a tool capable of testing all these distributed APIs in a coordinated manner. I needed to create a test product via Microservice 3, then check if Microservice B returned this product in the results of the product search API. Also, I wanted to create a product via a service located higher in the hierarchy, Microservice C, and then check again if Microservice B returned this product. If at least one of these tests fails, it indicates that a corresponding flow is broken. If a product is pushed to C and does not appear in B, it indicates that one of the three services, B, C, or 3, is having problems. If a product was pushed to 3 and it doesn’t appear in B, the issue is very likely in Microservice C.
Requirement 2. JSON Templating 1.
Our microservices may have similar-looking data structures in the request and response JSONs, so I wanted to avoid duplicate code and make the dataset less error-prone. The simplest solution is a template language for JSON. JSON doesn’t have any mechanism to reference or include JSON in other files, and all attempts to invent one were not successful. It was always ugly and hard to maintain.
Requirement 3. JSON Templating 2.
Some input data might be huge, and structures might be very complex. In some cases, JSON files were 300K in size and had a complexity of up to 15 nesting levels. Not all data structures were under our control, so splitting and simplifying, harmonizing and unifying the data formats used in all microservices was really hard. We needed a mechanism to reliably build such JSONs based on some rules to make it easier to develop and maintain the tests. We wanted to avoid building JSONs via code, because such code is error-prone and will need its own tests.
Requirement 4. Response-format-aware actual-to-expected comparison (“smart compare”).
We needed to compare the actual response with the expected response. However, byte-to-byte comparison was not an option for us. If we compare JSONs, we should compare structures; formatting should not be important as long as the JSON is valid. Even the order of the JSON attributes at any level should not be important, only their paths from the root element. In some cases, the order of the array items should be ignored, including the case when such array items are non-uniform JSON structures with their own arrays and nested levels. We call it “smart compare”.
Requirement 5. Compatibility with various development environments.
The tool should be a console app and support MacOS (Bash), Linux (Bash), and Windows (PowerShell).
Key concepts
Architecture
There are three steps:
- Prepare — building up a request profile
- Make a call — sending an HTTP request to a service
- Analyze the response and compare it with the expected response (optional)
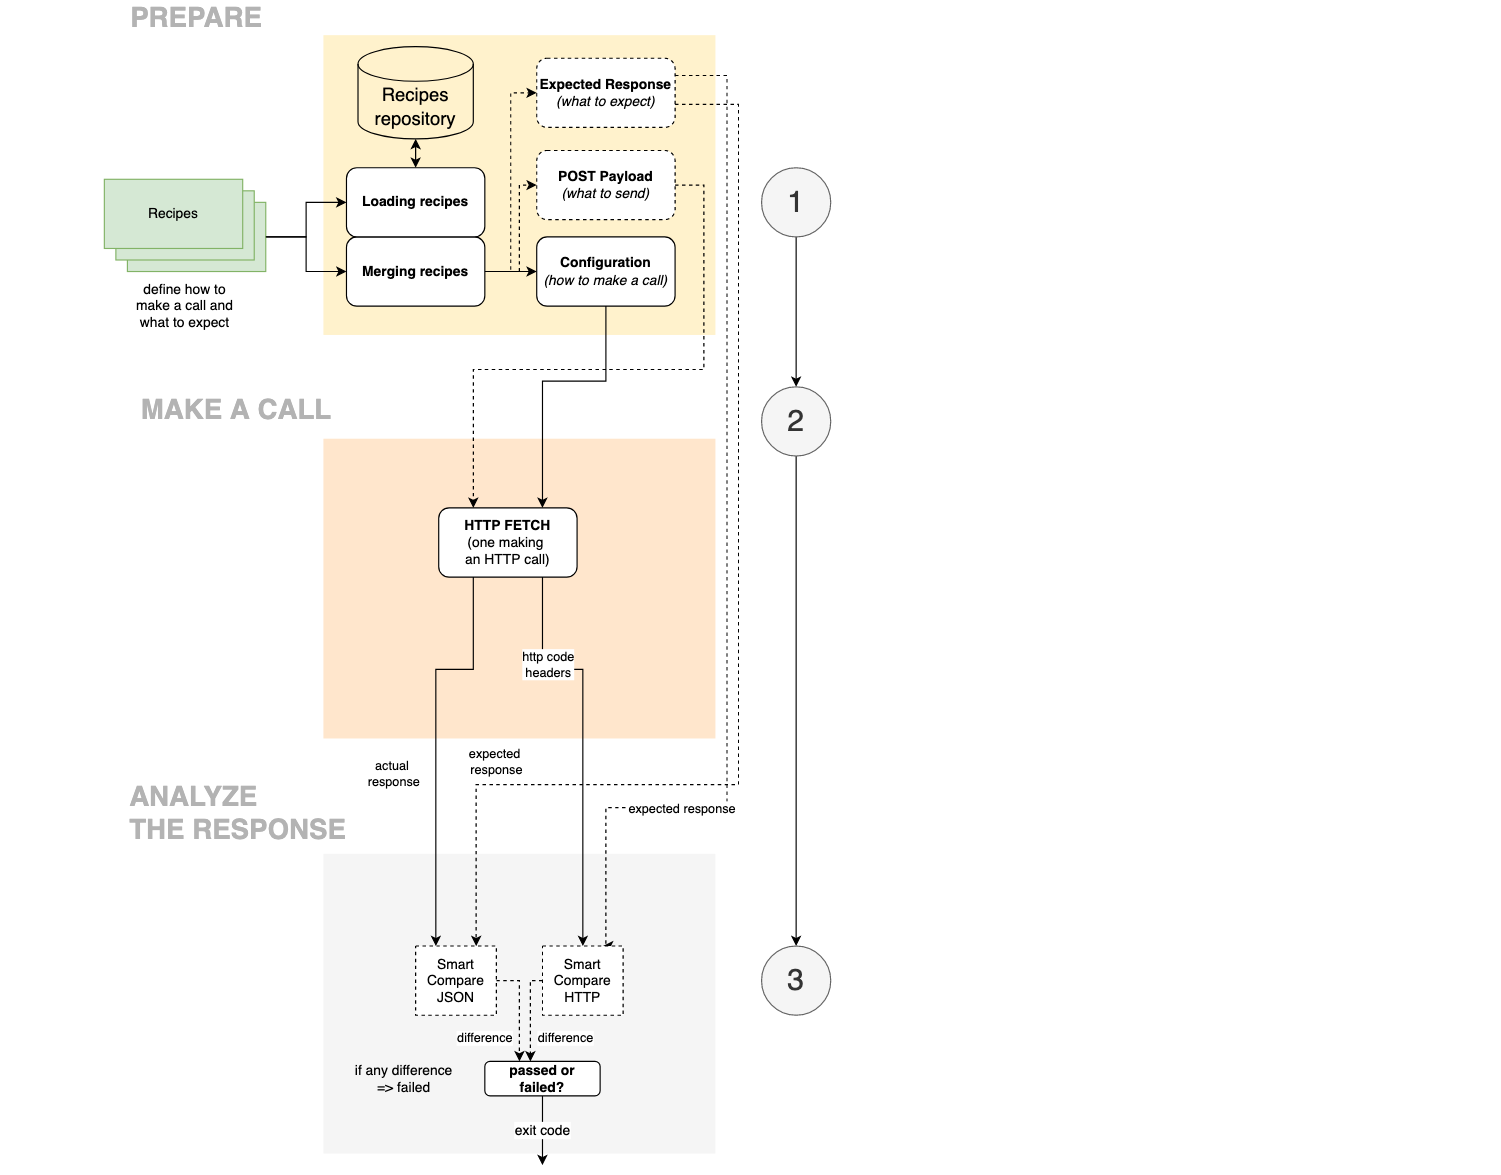
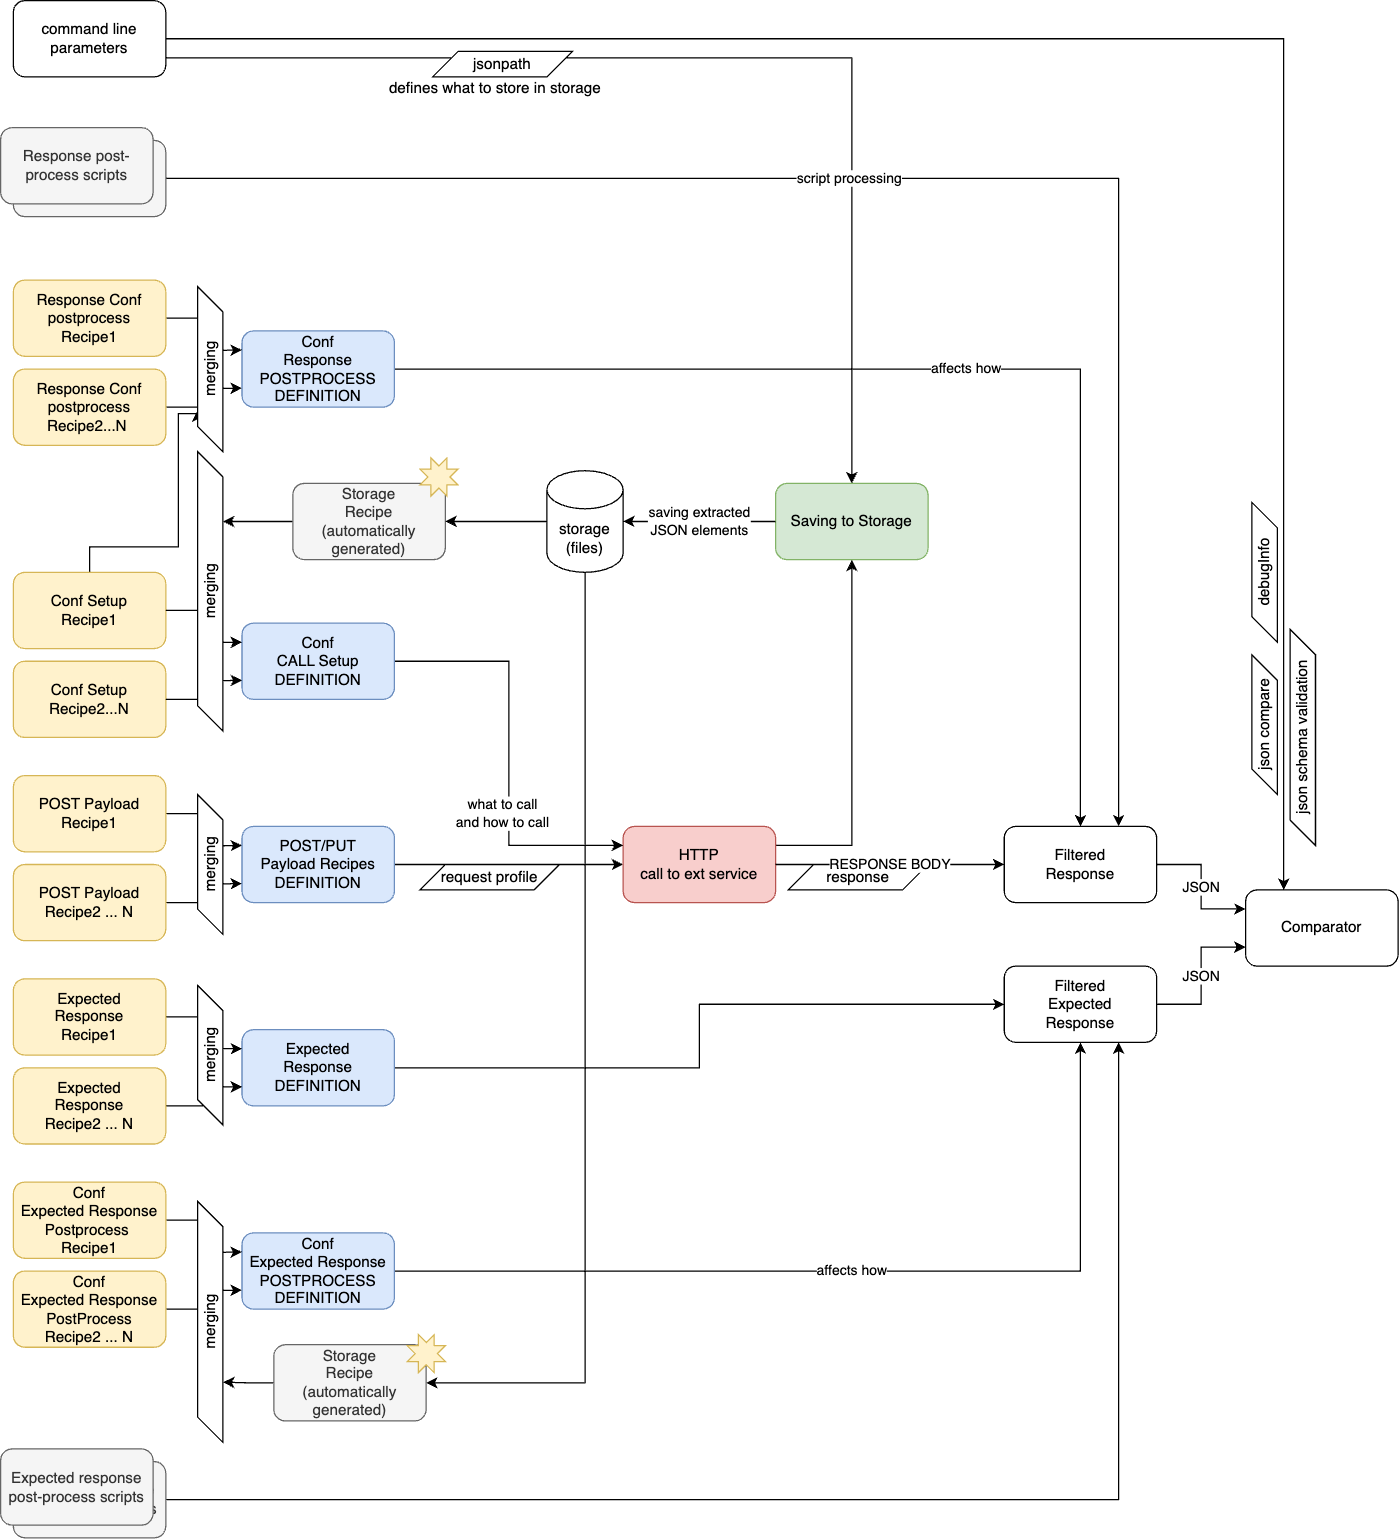
Recipes
A recipe is a JSON fragment contributing to a payload, an expected response, or a configuration of the HTTP call. It is just a JSON file located in the recipe repository directory.
A set of recipes defines everything that you need to make an HTTP call: what URL to hit, what headers to use, a retry policy, an HTTP method to use, authorization, and authentication details.
An app accepts recipes to build a call profile and, separately, recipes to form an expected response.
A recipe is a JSON file. It has two predefined root elements:
conffor a call profilepayloadto form POST/PUT/PATCH payload
A conf section describes the call profile: everything but the payload.
A payload section is designed to describe a payload for a call.
There are two types of recipes:
- request payload building recipe (
--recipesand--recipes-payload) - expected response building recipe (
--resprecipesand--resprecipes-payload)
The suffix “payload” is used to specify the JSON components directly in the command line. In the example below, there are three components: “essential-attributes”, “images”, and “product-categories”. There they are specified in the JSON file, which is a recipe. However, you can take them out to the command line and use them via --recipes-payload.
Example of a recipe:
recipes/u/products/get.json:
{
  "conf": {
    "url": "${_conf.host}/get-product?sku=${_conf.sku}",
    "method": "GET"
  }
}
recipes/response/products/get/TESTPRODUCTSKU.json:
{
  "payload": [
    "/payload/products/get/essential-attributes",
    "/payload/products/get/images",
    "/payload/products/get/product-categories"
  ]
}
recipes/s/products/get/test-product.json:
{
  "conf": {
    "sku": "TESTPRODUCTSKU"
  }
}
recipes/e/qa1.json:
{
  "conf": {
    "host": "https://qa1"
  }
}
Running the test with these three recipes:
> e2e-cli \
  --recipe recipes/u/products/get \
  --recipe recipes/e/qa1 \
  --recipe recipes/s/products/get/test-product \
  --resprecipe recipes/response/products/get/TESTPRODUCTSKU
TEST PASSEDRecipes repository
Each recipe is just a file in the filesystem, and the path to it is often self-explanatory.
recipes/u/shopping-cart/get-items.json
recipes/p/eu/belgium.json
recipes/e/qa2.json
So, using separate files is also convenient to track changes in the recipes.
In the parameters, the file extension can be omitted.
> e2e-cli \
  --recipe recipes/u/products/get.json \
  --recipe recipes/e/qa1.json
> e2e-cli \
--recipe recipes/u/get-products \
--recipe recipes/e/qa1The location of the recipes folder can be configured, or e2e-cli will try to locate it by scanning the current directory, the parent directory of the current directory, and the parent directory of the parent directory until it reaches the root folder.
Dimensions
In our project, we use recipe groups, also called dimensions. Examples of the dimensions:
- Environment (“e”)
- Language (“l”)
- Country (“c”)
- Tests
If we had just three dimensions, our test would have been defined as a point in three-dimensional space. In our project, we have six dimensions.
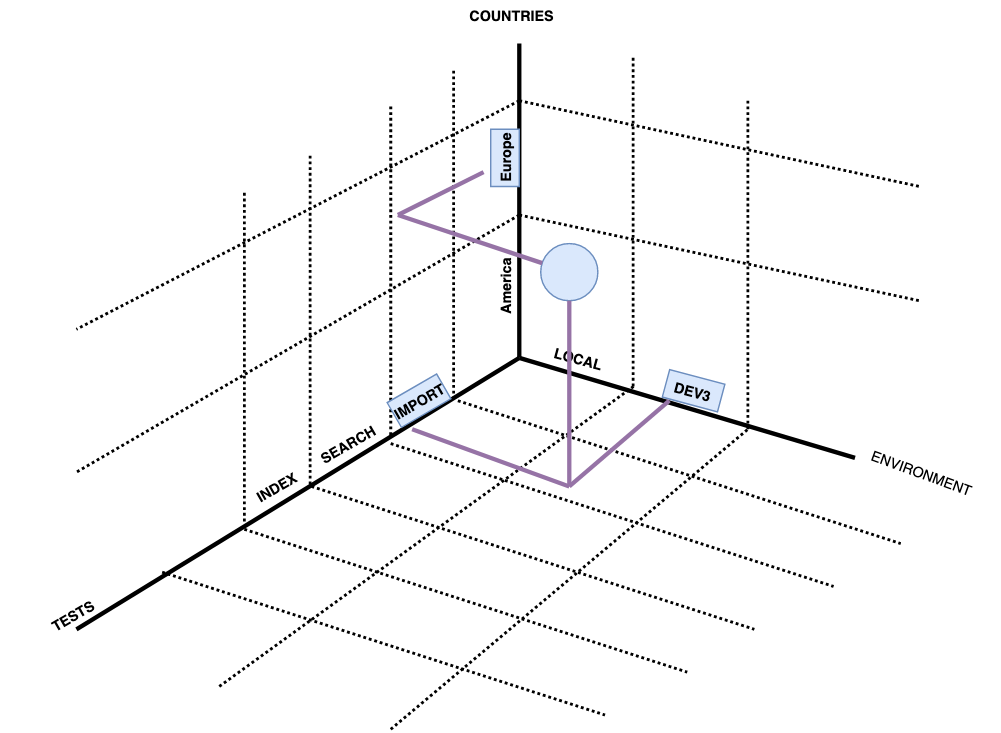
Each dimension deals only with the stuff related to the topic this dimension covers. For example, the environment (“e”) dimension contains environment-specific information. For example, URLs are environment-specific.
> e2e-cli --recipe u/get-products --recipe e/qa1 --recipe c/us> e2e-cli --recipe u/get-products --recipe e/qa2 --recipe c/us> e2e-cli --recipe u/get-products --recipe e/qa2 --recipe c/euRecipe Merging
If you use more than one recipe, internally the system merges all of them together to form a single recipe, which is used to build a call profile. Typically, you need a recipe from each essential dimension.
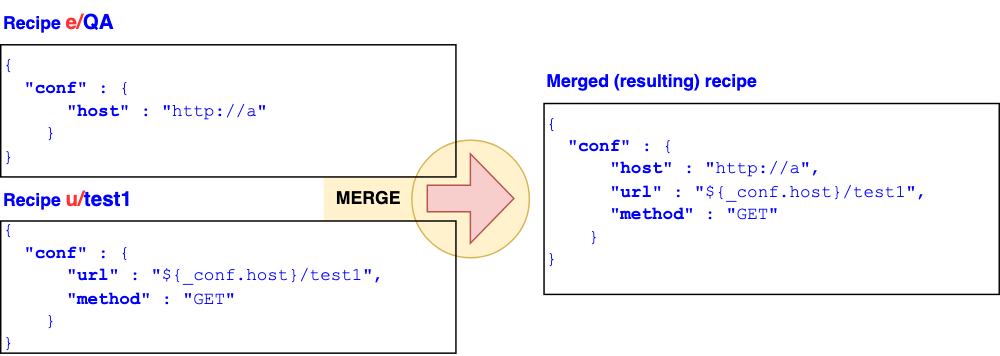
The JSON structures are merged so that the resulting recipe does not contain duplicates.
JSON arrays are merged so that the resulting recipe may have duplicates unless a modifier, _replace or _unique, is specified.
_replace: can be used both for structures and arrays_unique: can be used only for arrays; for structures, it is implied
The following table illustrates the recipe merging rules.
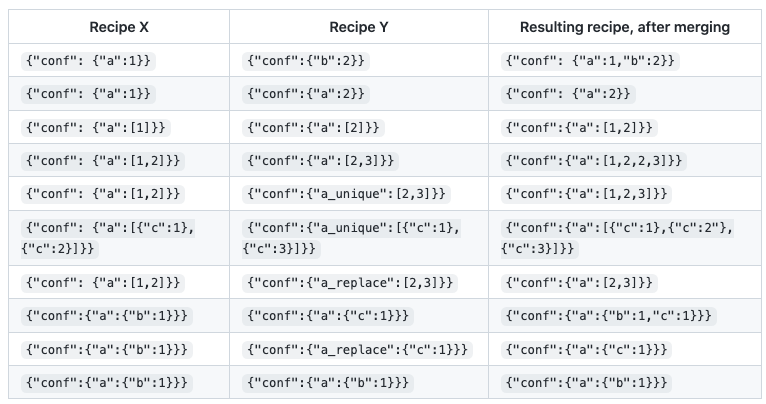
Recipe merging is handy if you need to send similar-looking JSONs to different endpoints.
Additionally, you can merge arrays with specified unique keys. A list of unique keys is specified right after the array name: <arr>_unique_<fields-comma-separated>.
For example, we have two fragments:
{
  "arr": [
    {
      "id": 1,
      "id2": { "code": "a" },
      "text": "one"
    },
    {
      "id": 2,
      "text": "two"
    }
  ]
}
And:
{
  "arr_unique_id,id2": [
    {
      "id": 1,
      "id2": { "code": "a" },
      "addf": "one-additional-field"
    },
    {
      "id": 3,
      "id2": { "code": "b" },
      "text": "three"
    }
  ]
}
The merged JSON is:
{
  "arr": [
    {
      "id": 2,
      "text": "two"
    },
    {
      "id": 1,
      "id2": {
        "code": "a"
      },
      "text": "one",
      "addf": "one-additional-field"
    },
    {
      "id": 3,
      "id2": {
        "code": "b"
      },
      "text": "three"
    }
  ]
}
Test scenarios
Test scenarios consist of test cases that analyze positive and negative aspects of the project and identify potential flaws in order to evaluate possible outcomes. It involves a number of steps incorporated to ease the work of test cases. There are multiple test cases that are used to ensure the program’s functionality from end to end is functioning correctly as expected. It’s more like a test procedure that includes multiple test cases.
Scenarios help in an easier way to test and evaluate complicated end-to-end problems.
The building blocks of a scenario can be reused in other scenarios.
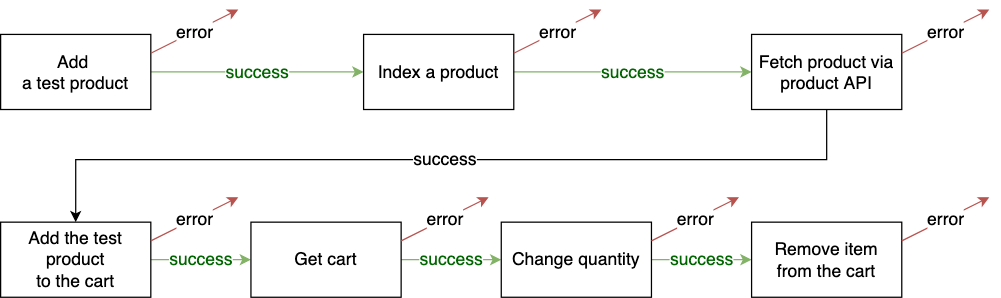
For example, you may want to test the same sequence for the logged-in user:
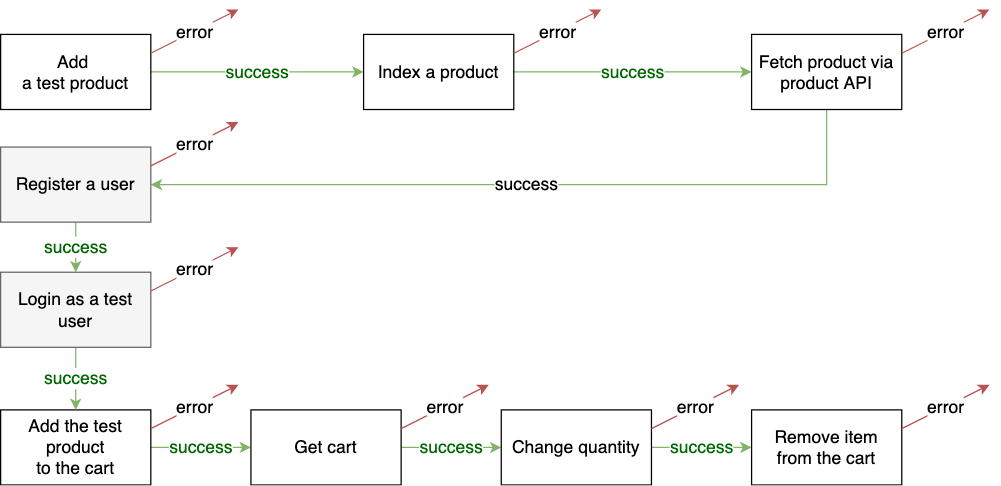
As you see, the building blocks are the same, and the same blocks can be reused if such a need arises.
In our current version, we use Bash scripting to organize e2e-cli calls into a scenario. It is not nice because Bash is not perfect, but this approach was demonstrated to be very flexible. However, involving Bash creates complexity for Windows users, where Bash is not installed by default. We use WSL (Windows Subsystem for Linux) to overcome this limitation.
For the example above, the scenario script looks as follows:
./add-product.sh && \
./index-product.sh && \
./fetch-product.sh && \
./register-user.sh && \
./login.sh && \
./add-product-to-cart.sh && \
./get-cart.sh && \
./change-quantity.sh && \
./remove-item && \
echo "DONE";
add-product.sh:
> e2e-cli \
  --recipe recipes/u/products/add \
  --recipe recipes/e/$_ENV
  --recipe recipes/c/$_COUNTRY
  --recipe recipes/payloads/products/sample-product
  --resprecipe recipes/resp/products/add
POST Payloads
Since the POST payloads in our project may be very complex, we construct them from fragments following the same logic as recipe merging:
recipes/payloads/products/sample-product:
{
  "payload": [
    "payloads/products/sample/essential-attributes",
    "payloads/products/sample/images",
    "payloads/products/sample/product-categories"
  ]
}
payloads/products/sample/essential-attributes:
{
  "name": "productSampleName",
  "debugInfo": [ "essential-attributes" ]
}
payloads/products/sample/images:
{
  "primaryImage": { "url": "https://…" },
  "thumbnailImage": { "url": "https://…" },
  "debugInfo": [ "images" ]
}
payloads/products/sample/product-categories:
{
  "categories": [ { "code": "testCategory" } ],
  "debugInfo": [ "product-categories" ]
}
After merging, the following JSON is generated. It will be sent to the service as a payload:
{
  "name": "productSampleName",
  "debugInfo": [
    "essential-attributes",
    "images",
    "product-categories"
  ],
  "primaryImage": { "url": "https://…" },
  "thumbnailImage": { "url": "https://…" },
  "categories": [ { "code": "testCategory" } ]
}
Specifying POST payloads as parameters
The system supports specifying POST payloads as parameters of e2e-cli.
The following test will work exactly as add-product.sh.
add-product-with-payloads-as-parameters.sh:
> e2e-cli \
  --recipe recipes/u/products/add \
  --recipe recipes/e/$_ENV
  --recipe recipes/c/$_COUNTRY
  --recipe-payload payloads/products/sample/essential-attributes
  --recipe-payload payloads/products/sample/images
  --recipe-payload payloads/products/sample/product-categories
  --resprecipe recipes/resp/products/add
Storage
For scenarios, it is important to use some information returned by a service in subsequent calls. Typical examples are OAuth tokens, cart IDs, etc.
For this purpose, there is a concept of storage JSONs. Technically and syntactically, these are just recipes, but writable and updatable.
e2e-cli \
  --recipes payloads/recipes/c/shoppingcart/user/testuser \
  --recipes payloads/recipes/e/qa2 \
  --recipes payloads/recipes/p/us \
  --recipes payloads/recipes/u/auth/token \
  --recipes payloads/recipes/c/auth/token \
  --storage storage/acc-shopping-cart \
  --storage-save "token: $.access_token"
This command performs a call to the OAuth server and saves access_token from the response to the storage JSON:
storage/acc-shopping-cart.json:
{
  "conf": {
    "token": "43853ad1-cab5-4c3f-953c-f8a5eb990c25"
  }
}
As you see, the file is of the same syntax as a normal recipe, so it can be used in subsequent commands such as createCart:
e2e-cli \
  --recipes payloads/recipes/c/shoppingcart/user/testuser \
  --recipes storage/acc-shopping-cart \
  --recipes payloads/recipes/e/qa2 \
  --recipes payloads/recipes/p/us \
  --recipes payloads/recipes/c/shoppingcart/create \
  --recipes payloads/recipes/u/shoppingcart/create \
  --storage storage/acc-shopping-cart \
  --storage-save "code: $.guid" \
  --storage-save "anonymousGuid: $.guid" \
  --resprecipes payloads/recipes/resp/shoppingcart/create
This command creates a shopping cart, and we need to store the generated cart GUIDs. Note that the token is not removed from the storage file when code and anonymousGuid are added:
{
  "conf": {
    "token": "43853ad1-cab5-4c3f-953c-f8a5eb990c25",
    "code": "a8e7f16b-a88e-4c52-ac86-4ad88c12bc2e",
    "anonymousGuid": "d2f04371-cb6d-44ff-b893-4d3aba58738c"
  }
}
Call profile configuration
The recipes having the conf section at the root level define the call profile. It has information on what to call and how to make a call.
Below are some of the attributes the system takes into account:
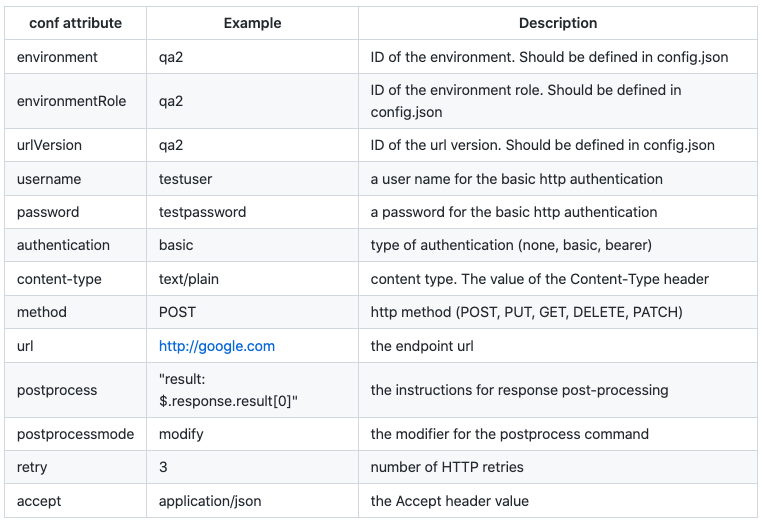
Additionally, the conf section can have any number of user-defined attributes. They can be referenced as ${_conf.name}:
recipes/u/products/get.json:
{
  "conf": {
    "url": "${_conf.host}/get-product?sku=${_conf.sku}",
    "method": "GET",
    "sku": "testSku",
    "host": "http://…"
  }
}
Substitutions
The elements from the conf section can be used in the payload or expected response. The conf section can also substitute from itself. For example, you have the following conf section:
{
  "conf": {
    "A": {
      "number": 2,
      "array": [ 1, 2, { "B": 3 } ],
      "struct": {
        "C": 4,
        "D": { "E": 5 }
      }
    }
  }
}
In JSONs for a payload or expected response, or in other conf-section-purpose JSONs, you can use substitutions as follows:
{
  "test_struct": "${struct:_conf.A}",
  "test": "${_conf.A.number}",
  "test_number": "${number:_conf.A.number}",
  "test_array": "${array:_conf.A.array}"
}
The resulting JSON will look like:
{
  "test_struct": {
    "number": 2,
    "array": [
      1,
      2,
      {
        "B": 3
      }
    ],
    "struct": {
      "C": 4,
      "D": {
        "E": 5
      }
    }
  },
  "test": "2",
  "test_number": 2,
  "test_array": [
    1,
    2,
    {
      "B": 3
    }
  ]
}
Post-processing
Prior to JSON Smart Compare, the service’s response can be post-processed. For example, some fields can be removed or their values can be replaced.
For example, the following recipe leaves only two fields from the HTTP response. These fields are extracted from the first item of the array.
{
  "conf": {
    "postprocess": [
      "city: $.response[0].address.city",
      "companyname: $.response[0].company.name"
    ]
  }
}
The format of the postprocess items is the following:
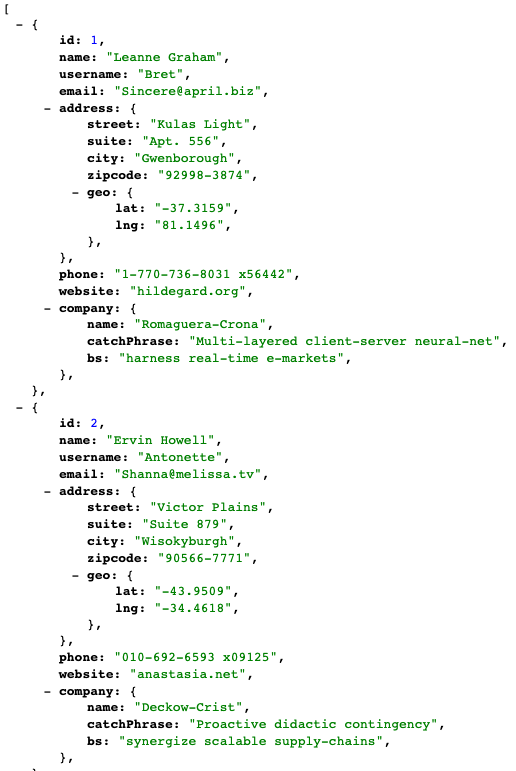
"<targetfield>: <jsonpath>"JsonPath expressions refer to a JSON structure in the same way as XPath expressions are used in combination with an XML document. See https://jsonpath.com/ for details.
The JSON is from https://jsonplaceholder.typicode.com/users.
By default, postprocessing leaves only the fields listed in the postprocess array.
There is also a special mode, “modify”. Unlike the default mode, the resulting JSON will have all fields from the response, with some modifications controlled by the rules listed in postprocess. The “-” prefix means that the field should be removed from the resulting JSON.
"postprocessmode": "modify",
"postprocess": [
  "-id:"
]
You can remove attributes deeper in the structure: -a.b.c.d. Also, you can address a specific array element: -a[0].b.c[1].d. Also, you can iterate over all elements of an array and process things for each item: -a[].b[].c.
You can use it for more complex scenarios:
{
  "postprocessmode": "modify",
  "postprocess": [
    "-[0].address.zipcode"
  ]
}
This will remove address.zipcode from the first element of an array.
If you need to remove all elements from the array, use []. For example:
{
  "conf": {
    "postprocessmode": "modify",
    "postprocess": [
      "-a[].b[].d"
    ]
  }
}
This will remove all d from:
{
  "a": [
    {
      "b": [
        { "c": 1, "d": 1 },
        { "c": 2, "d": 2 },
        { "c": 3, "d": 3 }
      ],
      "b1": [
        { "c": 1, "d": 1 },
        { "c": 2, "d": 2 },
        { "c": 3, "d": 3 }
      ]
    }
  ]
}
So that the resulting JSON will be:
{
  "a": [
    {
      "b": [
        { "c": 1 },
        { "c": 2 },
        { "c": 3 }
      ],
      "b1": [
        { "c": 1, "d": 1 },
        { "c": 2, "d": 2 },
        { "c": 3, "d": 3 }
      ]
    }
  ]
}
Mocking
If you want to use a mock response (JSON) instead of making a real call, use conf.mockresponse instead of conf.url.
{
  "conf": {
    "mockresponse": {
      "a": 1
    }
  }
}
Debugging
There are two environment variables for this purpose:
verbose=trueactivates verbose mode, where you can see what was sent and what was received from the service.debugInfo=trueinjects additional information into the JSONs for troubleshooting purposes. See “Debugging: Tracing”.
To activate debugging mode, set the environment variable verbose to true:
> verbose=true e2e-cli --recipes ….With this mode on, the system output becomes more detailed, shows the merged JSON, and also builds a curl command that can be launched independently. So, for each e2e-cli test, you can get a curl command easily just by activating verbose mode.
For example:
verbose=true e2e-cli \
  --recipes payloads/recipes/e/dummy \
  --recipes payloads/recipes/u/dummy/users \
  --recipes payloads/recipes/c/dummy/address.city.zipcode.json \
  --resprecipes payloads/recipes/resp/dummy/city-zipcode \
  ;
Output:
List of recipes involved:
./payloads/recipes/resp/dummy/city-zipcode.json
./payloads/components/response/dummy/city.json
./payloads/components/response/dummy/zipcode.json
./payloads/recipes/e/dummy.json
./payloads/recipes/u/dummy/users.json
./payloads/recipes/c/dummy/address.city.zipcode.json
merged JSON:{
comment: {
'dummy environment activated': '',
'http parameters - GET /users': '',
'postprocess activated: response[0].address.city': '',
'postprocess activated: response[0].address.companyname': ''
},
environment: 'dummy',
url: '${_conf.environment}/users',
method: 'GET',
authentication: 'none',
environmentRole: '/dummy',
postprocess: [
'city: $.response[0].address.city',
'zipcode: $.response[0].address.zipcode'
]
}
curl -k 'https://jsonplaceholder.typicode.com/users' -X GET -H "Content-Type: application/json" -H "Accept: application/json"
setting city to Gwenborough
setting zipcode to 92998-3874
comparing
--------RECEIVED FROM THE SERVICE-----------
{
"city": "Gwenborough",
"zipcode": "92998-3874"
}
--------EXPECTED RESPONSE-----------
{
"city": "Gwenborough",
"zipcode": "92998-3874"
}
-------------------------------------
TEST PASSEDFor your reference, below are a command and the recipes used for the example above:
verbose=true e2e-cli \
  --recipes payloads/recipes/e/dummy \
  --recipes payloads/recipes/u/dummy/users \
  --recipes payloads/recipes/c/dummy/address.city.zipcode.json \
  --resprecipes payloads/recipes/resp/dummy/city-zipcode \
  ;
payloads/recipes/e/dummy.json:
{
  "conf": {
    "comment": {
      "dummy environment activated": ""
    },
    "environment": "dummy"
  }
}
payloads/recipes/u/dummy/users.json
{
  "conf": {
    "url": "${_conf.environment}/users",
    "method": "GET",
    "authentication": "none",
    "environmentRole": "/dummy",
    "comment": {
      "http parameters - GET /users": ""
    }
  }
}
payloads/recipes/c/dummy/address.city.zipcode.json
{
  "conf": {
    "comment": {
      "postprocess activated: response[0].address.city": "",
      "postprocess activated: response[0].address.companyname": ""
    },
    "postprocess": [
      "city: $.response[0].address.city",
      "zipcode: $.response[0].address.zipcode"
    ]
  }
}
payloads/recipes/resp/dummy/city-zipcode.json:
{
  "payload": [
    "payloads/components/response/dummy/city",
    "payloads/components/response/dummy/zipcode"
  ]
}
Debugging: Tracing
Additionally, there is an environment variable, debugInfo, which activates tracing mode.
For example, for the following test:
nafta-test \
  --recipes recipes/debug-info/recipe1 \
  --recipes recipes/debug-info/recipe2 \
  --conf-recipes recipes/debug-info/recipe-conf \
  --debug true \
  ;
recipe1:
{
  "payload": [
    "recipes/debug-info/components/recipe1-1",
    "recipes/debug-info/components/recipe1-2"
  ]
}
recipe2:
{
  "conf": {
    "conf1": 1
  },
  "payload": [
    "recipes/debug-info/components/recipe2-1"
  ]
}
recipes-conf:
{
  "conf": {
    "conf_gl1": 11
  }
}
recipe1-1:
{
  "a": 1,
  "b": {
    "c": 2,
    "d": [ { "e": 3 } ],
    "f": ["a", "b", "c"]
  }
}
recipe1-2:
{
  "a": 3,
  "b": {
    "c1": 22,
    "d": [ { "e1": 4 } ],
    "f": ["d", "e", "f"]
  }
}
recipe2-1:
{
  "a": 4
}
The output with debugInfo=true and verbose=true will look as follows:
nafta-test \
  --recipes recipes/debug-info/recipe1 \
  --recipes recipes/debug-info/recipe2 \
  --conf-recipes recipes/debug-info/recipe-conf \
  --debug true \
  ;
==================================================================
./recipes/debug-info/recipe-conf.json
./recipes/debug-info/recipe1.json
./recipes/debug-info/recipe2.json
./recipes/debug-info/components/recipe1-1.json
./recipes/debug-info/components/recipe1-2.json
./recipes/debug-info/components/recipe2-1.json
{
  "conf": {
    "conf_gl1": 11,
    "conf1": 1,
    "url": ""
  },
  "conf__source": {
    "conf_gl1": 11,
    "conf_gl1__source": [
      "./recipes/debug-info/recipe-conf.json"
    ],
    "conf1": 1,
    "conf1__source": [
      "./recipes/debug-info/recipe2.json"
    ]
  },
  "payloadData": {
    "conf__source": {
      "conf_gl1": 11,
      "conf_gl1__source": [
        "./recipes/debug-info/recipe-conf.json"
      ],
      "conf1": 1,
      "conf1__source": [
        "./recipes/debug-info/recipe2.json"
      ]
    },
    "__source": [],
    "a": 4,
    "b": {
      "c": 2,
      "d": [
        {
          "e": 3
        },
        {
          "e1": 4
        }
      ],
      "f": [
        "a",
        "b",
        "c",
        "d",
        "e",
        "f"
      ],
      "c1": 22
    },
    "a__source": [
      "./recipes/debug-info/components/recipe1-1.json",
      "./recipes/debug-info/components/recipe1-2.json",
      "./recipes/debug-info/components/recipe2-1.json"
    ],
    "b__source": {
      "c": 2,
      "d": [
        {
          "e": 3,
          "e__source": [
            "./recipes/debug-info/components/recipe1-1.json"
          ]
        },
        {
          "e1": 4,
          "e1__source": [
            "./recipes/debug-info/components/recipe1-2.json"
          ]
        }
      ],
      "f": [
        "a",
        "b",
        "c",
        "d",
        "e",
        "f"
      ],
      "c__source": [
        "./recipes/debug-info/components/recipe1-1.json"
      ],
      "d__source": [
        {
          "e": 3,
          "e__source": [
            "./recipes/debug-info/components/recipe1-1.json"
          ]
        },
        {
          "e1": 4,
          "e1__source": [
            "./recipes/debug-info/components/recipe1-2.json"
          ]
        }
      ],
      "f__source": [
        "a (from ./recipes/debug-info/components/recipe1-1.json)",
        "b (from ./recipes/debug-info/components/recipe1-1.json)",
        "c (from ./recipes/debug-info/components/recipe1-1.json)",
        "d (from ./recipes/debug-info/components/recipe1-2.json)",
        "e (from ./recipes/debug-info/components/recipe1-2.json)",
        "f (from ./recipes/debug-info/components/recipe1-2.json)"
      ],
      "c1": 22,
      "c1__source": [
        "./recipes/debug-info/components/recipe1-2.json"
      ]
    }
  },
  "expected": null
}
As you see, there are additional fields ending with __source. They show from which recipe the value of the attribute was taken. Also, notice that (from ./recipes/debug-info/components/recipe1-2.json) was automatically added to the elements of the array.
Additionally, it supports overrides from the command line:
nafta-test \
  --conf-recipes recipes/debug-info/recipe-conf \
  --recipes recipes/debug-info/recipe1 \
  --recipes recipes/debug-info/recipe2 \
  -k "{ "conf" : { "over1" : 1 }}" \
  --debug;
...
"conf__source": {
"over1": 1,
"over1__source": "[overrides from the command line #1]"
}
...Smart Compare
The test compares the actual response with the expected response. The latter is built with the same approach as a body payload, via JSON merging.
From the last example above, the recipe from the resprecipe parameter contains a payload section, which has two JSONs. These JSONs are merged, and the resulting JSON is compared with what the service responds with.
payloads/recipes/resp/dummy/city-zipcode.json:
{
  "payload": [
    "payloads/components/response/dummy/city",
    "payloads/components/response/dummy/zipcode"
  ]
}
payloads/components/response/dummy/city.json:
{
  "city": "Gwenborough"
}
payloads/components/response/dummy/zipcode.json:
{
  "zipcode": "92998-3874"
}
The merged JSON will contain both city and zipcode:
{
  "city": "Gwenborough",
  "zipcode": "92998-3874"
}
The service responds with the JSON containing a list of items: https://jsonplaceholder.typicode.com/users.

The recipe extracts only two fields from the response, defined by postprocess:
payloads/recipes/c/dummy/address.city.zipcode.json
{
  "conf": {
    "postprocess": [
      "city: $.response[0].address.city",
      "zipcode: $.response[0].address.zipcode"
    ]
  }
}
So the resulting JSON will contain only city and zipcode if they were present in the actual response.
Then the system normalizes both actual and expected JSONs.
Normalization involves rearranging the fields. The algorithm arranges the fields based on their values, so the JSONs with the same values will have the fields arranged in the same way. After that, the system compares the structures, highlighting the differences.
In the next example, the service responded with five fields (body, body2, title, userId, id), while the expected response had only four fields (body, body2, title, userId). E2E CLI reported that id was added, body3 was deleted, and body2 got a new unexpected value:
--------RECEIVED FROM THE SERVICE-----------
{
  "body": "Sample Body",
  "body2": "Sample Body2",
  "id": 101,
  "title": "Sample Title",
  "userId": 1
}
--------EXPECTED RESPONSE-----------
{
  "body2": "Sample Body2_",
  "body3": "Sample Body3",
  "title": "Sample Title",
  "userId": 1
}
-------------------------------------
TEST NOT PASSED

ERROR: there is a difference between the actual response and expected response:
{
  body3__deleted: 'Sample Body3',
  body__added: 'Sample Body',
  id__added: 101,
  body2: { __old: 'Sample Body2_', __new: 'Sample Body2' }
}
If the fields had been arranged in a different order, the report would have been the same because the order of the fields is ignored.
By default, the order of the items of an array is also ignored. This mode can be changed via a command-line parameter.
Validation against the schema
If --schema is specified in the command line, the response recipe is interpreted as a JSON schema, and the expected response is validated against the schema.
Overriding recipes from the command line
Although it is not recommended, you can override the recipes from the command line by placing the JSON fragments as a parameter value.
e2e-cli \
  --recipes=payloads/recipes/e/qa2 \
  --recipes=payloads/recipes/p/us \
  --recipes=payloads/recipes/u/products/remove \
  --overrides-conf '{ "conf" : { "sku" : "testProduct1" } }' \
  --resprecipes payloads/recipes/resp/products/remove
There are three types of overrides:
- configuration (
override-conf) - request payload (
override) - response payload (
override-response)
The overrides help to make quick changes before implementing them as a separate recipe for permanent use.