
This article continues a series of articles on performance testing:
- Part 1. SAP Commerce Cloud Performance Testing Tools: Apache JMeter
- Part 2. Performance Testing Tools: Tsung
- Part 3. Performance Scripting: Writing Load Generators from Scratch
The introduction section repeats the one I used in the previous articles.
Introduction

SAP Commerce Cloud (previously known as SAP Hybris Commerce) is often used as a headless service with SAP Spartacus or third-party storefront solutions. The communication between the storefront and the platform happens via the SAP Commerce REST interface called Omni-Channel Connect (OCC). Additionally, SAP Commerce Cloud provides a set of APIs for integration (Integration APIs), content, and product management (CMS and Product Management APIs).
All these APIs are highly customizable, and even the smallest changes in configuration, the data model, or Java code may result in performance degradation. Performance testing is especially important when concurrency may be the source of a problem. To recognize and fix such issues in a timely manner, it is recommended to perform regular performance testing, ideally integrated into the build and deployment pipelines.
However, SAP Commerce Cloud intensively uses caching, and test plans may not reflect the true situation if they are not designed properly. Almost all database queries are cached inside the platform so that thousands of data-fetching operations (per web service call) do not even reach the database. If a cache were disabled, an average single call would take minutes. Fortunately, the cache is always on, but depending on many factors, it may or may not work efficiently.
The test scenarios should be designed in such a way that they mimic real user actions occurring in production. If your product catalog has thousands of products, and you expect a normal distribution, it is a bad idea to test the system against just a small set of test products. You may face the risk that Commerce Cloud demonstrates exceptional performance with this small set of products, but completely different results with actual traffic.
To mimic user behavior, API sample calls can be either generated or collected from the logs. For APIs, this dataset has a combination of when and what: a timestamp, a list of URLs, an HTTP method, a set of HTTP headers, and GET and POST payloads. It is often easier to simplify the model by firing the calls in a pattern that reflects actual traffic in its average approximations.
If you need to create complex behavior from the simulated virtual users in the load test, the built-in capabilities of off-the-shelf products may not be sufficient. For example, parsing output formats from an API response to create formatted inputs for an API request may be difficult for a particular load testing tool, but a quick and easy exercise for a high-level programming language. Another example is JMeter, which doesn’t support load steps out of the box.
Performance Scripting
Many tools, including the previously mentioned JMeter, provide SDKs for custom scripting to implement complex scenarios. However, in many cases, these SDKs bring the same limitations and complexities as the product they are based on.
For example, the JMeter SDK allows you to create test plans programmatically.
StandardJMeterEngine jm = new StandardJMeterEngine();
JMeterUtils.loadJMeterProperties("/my-jmeter.properties");
HashTree configuration = new HashTree();

HTTPSampler myHttpSampler = new HTTPSampler();
myHttpSampler.setDomain("www.google.com");
myHttpSampler.setPort(80);
myHttpSampler.setMethod("GET");
myHttpSampler.setPath("/");

LoopController loopController = new LoopController();
loopController.setLoops(1);
loopController.addTestElement(httpSampler);
loopController.setFirst(true);

SetupThreadGroup threadGroup = new SetupThreadGroup();
threadGroup.setNumThreads(1);
threadGroup.setRampUp(1);
threadGroup.setSamplerController(loopController);

TestPlan testPlan = new TestPlan("TestPlan1");

configuration.add("testPlan", testPlan);
configuration.add("loopCtrl", loopCtrl);
configuration.add("threadGroup", threadGroup);
configuration.add("httpSampler", httpSampler);

SaveService.saveTree(configuration,
   new FileOutputStream("example.jmx"));

jm.configure(configuration);
jm.run();
(The Maven template and configuration instructions are here: https://bitbucket.org/blazemeter/jmeter-from-code/)
This JMeter API gives a new level of flexibility, but both the JMeter GUI and the JMeter API use the same engine with multithreading in the core, as well as the same limitations and constraints. Java threads are architecturally not guaranteed to be time-sliced; they are part of the same process, and therefore they share the same memory space.
There is an alternative approach that uses an event loop: a single-threaded infinite cycle making one task at a time. JMeter doesn’t support it, but other tools do.
Let’s look at this mechanism in detail.
Each outbound HTTP request needs an open connection to perform read/write operations using syscalls provided by the operating system. These OSes can support thousands of open connections, which is enough for almost any task except benchmarking. The number of threads is limited to 5,000–15,000 in a modern OS.
These connections are mostly idle. In traditional synchronous processing, this implies devoting one thread to each user, and both the connections and threads wait until the call returns. This behavior can be very expensive in terms of memory and CPU consumption. JMeter works this way: a virtual user per thread, and therefore it is limited in the number of requests/users it can simulate.
In the first versions, the Java JDK supported only thread-blocking I/O with threads. JDK 1.4, released in 2001, added java.nio, or non-blocking I/O, or NIO. Java NIO provides the ability to read/write from connections without putting the thread to sleep. So, a single-threaded app can work effectively with multiple connections. Later, in 2011, JDK 1.7 was released with support for NIO.2, also known as asynchronous I/O.
These enhancements are not used by JMeter: it uses traditional thread-blocking I/O with thread pools. This is mainly because of architectural constraints that are hard to change after years of support. JMeter is a pretty old tool; it was initially released in 1998 and started supporting JDK 1.4 only in 2009.
There are a number of products on the market that are much more capable than JMeter. Most of them are commercial and targeted at professionals in load testing rather than developers who want to challenge their code when there is a need to deliver a better product. Some open-source products deserve mention here.
The Grinder uses the same load testing approach as JMeter, but allows scripting via Jython, a Java implementation of Python.
Tsung’s approach is different (see my previous article for details). It relies on Erlang, whose virtual machine does not create an OS thread for every created process and is very efficient in terms of memory and CPU use. However, Tsung’s extendability leaves something to be desired.
One possible approach is using designated libraries to write our own simple load generator from scratch. For my tasks, it was a faster and more reliable way to address concurrency issues in SAP Commerce Cloud custom code.
In this article, we take a closer look at how to write a load generator from scratch with Python.
Load Generators With Python
To minimize the cost of concurrent connections, there is an approach where load is generated in a single-threaded event loop. This means that all application code should aim to be asynchronous and non-blocking because only one operation can be active at a time.
We used Python for this purpose because Python’s tooling for performance testing is well established and documented. We reviewed the following Python libraries and frameworks for performance testing:
- Standard
- Asyncio (PSL)
- 3rd party
The asyncio module is an asynchronous I/O framework shipping with the Python Standard Library. It contains a set of network protocols, transports, and stream abstractions, equipped with a pluggable event loop. The event loop, the heart of the solution, provides APIs for request scheduling, data transmission, DNS lookups, and handling OS signals. This approach is also called “cooperative multitasking” because it gives a feeling of concurrency despite using a single thread in a single process.
The event loop keeps a table of future events, and for each event, you have a corresponding callback. All mentioned frameworks — Tornado, Twisted, and Asyncio — are based on callbacks.
Asyncio provides a foundation and API for running and managing coroutines, a specialized version of a generator function that can suspend its execution before reaching return and indirectly pass control to another coroutine for some time (read more: https://realpython.com/async-io-python/).
Architecture
Python helped us create complex and non-linear load plans. For our tests, we needed to take into account the dependencies between sequential calls and response caching implemented in SAP Commerce Cloud modules.
We needed to stress the cluster by sending different POST payloads and different URL parameters to challenge both our API implementation and the caching system.
So our “suite” got three components:
- URL and JSON payload generator for creating semi-randomly populated test plans
- Load generator for executing the test plans and generating a CSV report.
- Report generator that visualizes the CSV report
URL and payload generator
This component creates a list of URLs for a test and, if applicable, the JSON or XML payloads for them. The result is a set of files to use at the next phase.
For our sample load generator, the generated set contains only:
- List of URLs
- JSON file with a payload, one per URL
Load generator
This component reads the URLs from the file, as well as the payloads for them (if applicable, for POST). The app starts up, creates a number of threads as specified by the number of virtual users, and every thread reads a URL from the file, random or sequential, and a payload for the URL, and makes a GET or POST request. For every request, the app records the time it took to complete the entire request. The log has the following format:
REQSTART|<number>|<time>
…
REQEND|<time>|<number>|<duration>|<http status>
This information is used at the next phase, the report generator.
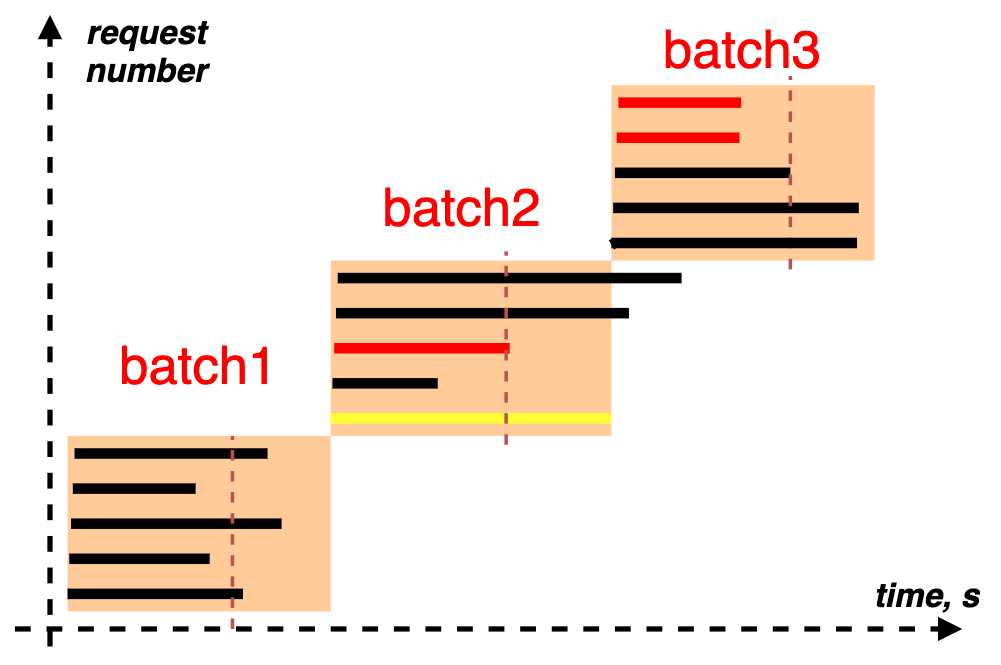
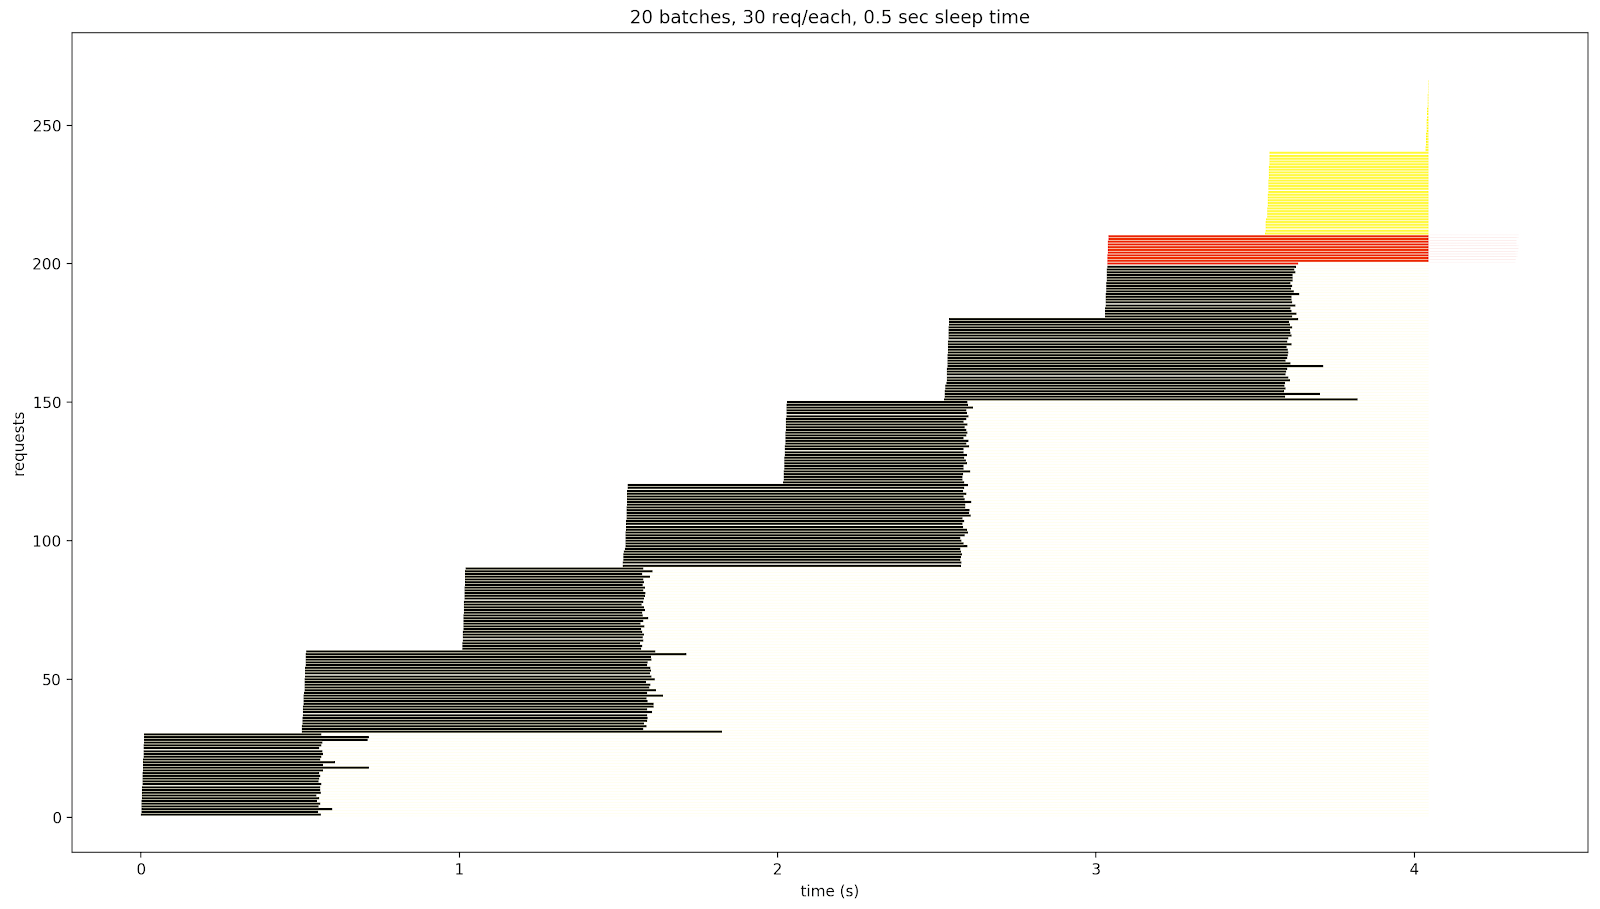
In our implementations, the requests are sent in batches, with a timeout between them. It helps visualize simultaneous virtual users and the time needed for the server to handle them. Internally, the requests in batches are not started at the same time, but the delays between them are much shorter than the delay between batches.
This approach helps simulate simple scenarios useful for debugging multithreading issues: the script is configured to run one batch with two or more simultaneous requests.
A request may result in:
- Successful response from the server (including a delayed response, which is still successful). The normal response codes are HTTP 2xx.
- Error response: the connection is closed by the server before the timeout occurs because of some error. The response code is often HTTP 5xx in this case.
- Redirection: the server asks the client to repeat an attempt using a new URL.
- Connection is closed by the server after the timeout occurs without sending anything back.
Report generator
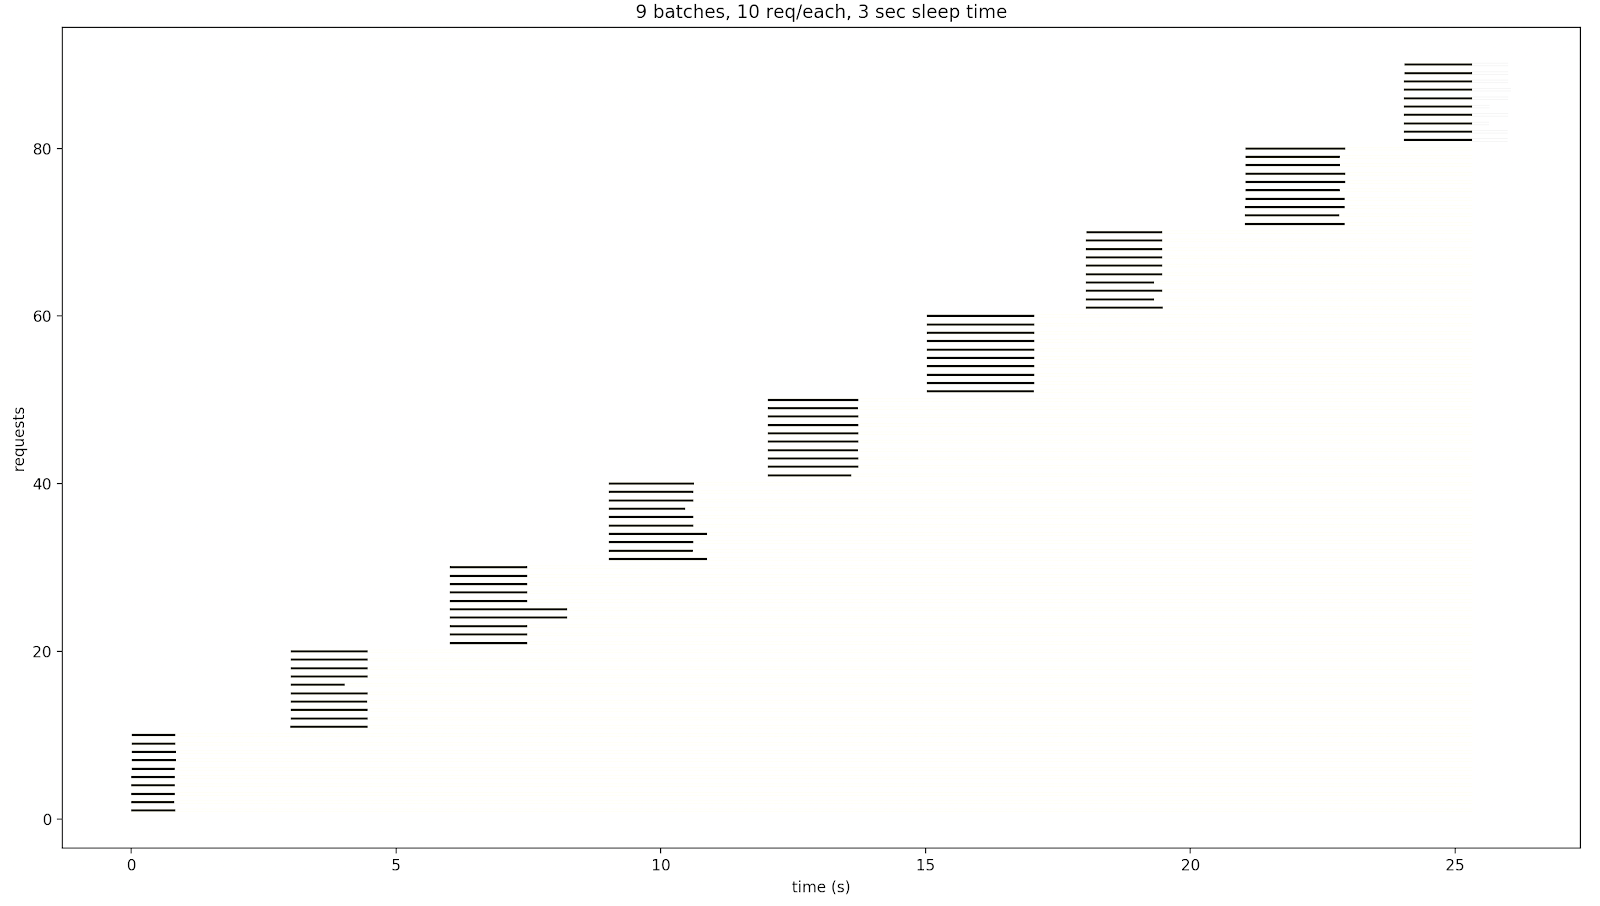
The report visualizes the log created by the load generator.
If the requests from the previous batch or batches are not finished by the time a new batch is started, they will affect the response time of the requests from the next batches because the limited resources will be shared among a larger number of requests. The yellow line represents a case when the response time exceeds a timeout. The red line represents the case when the response is an error (HTTP 500, for example).
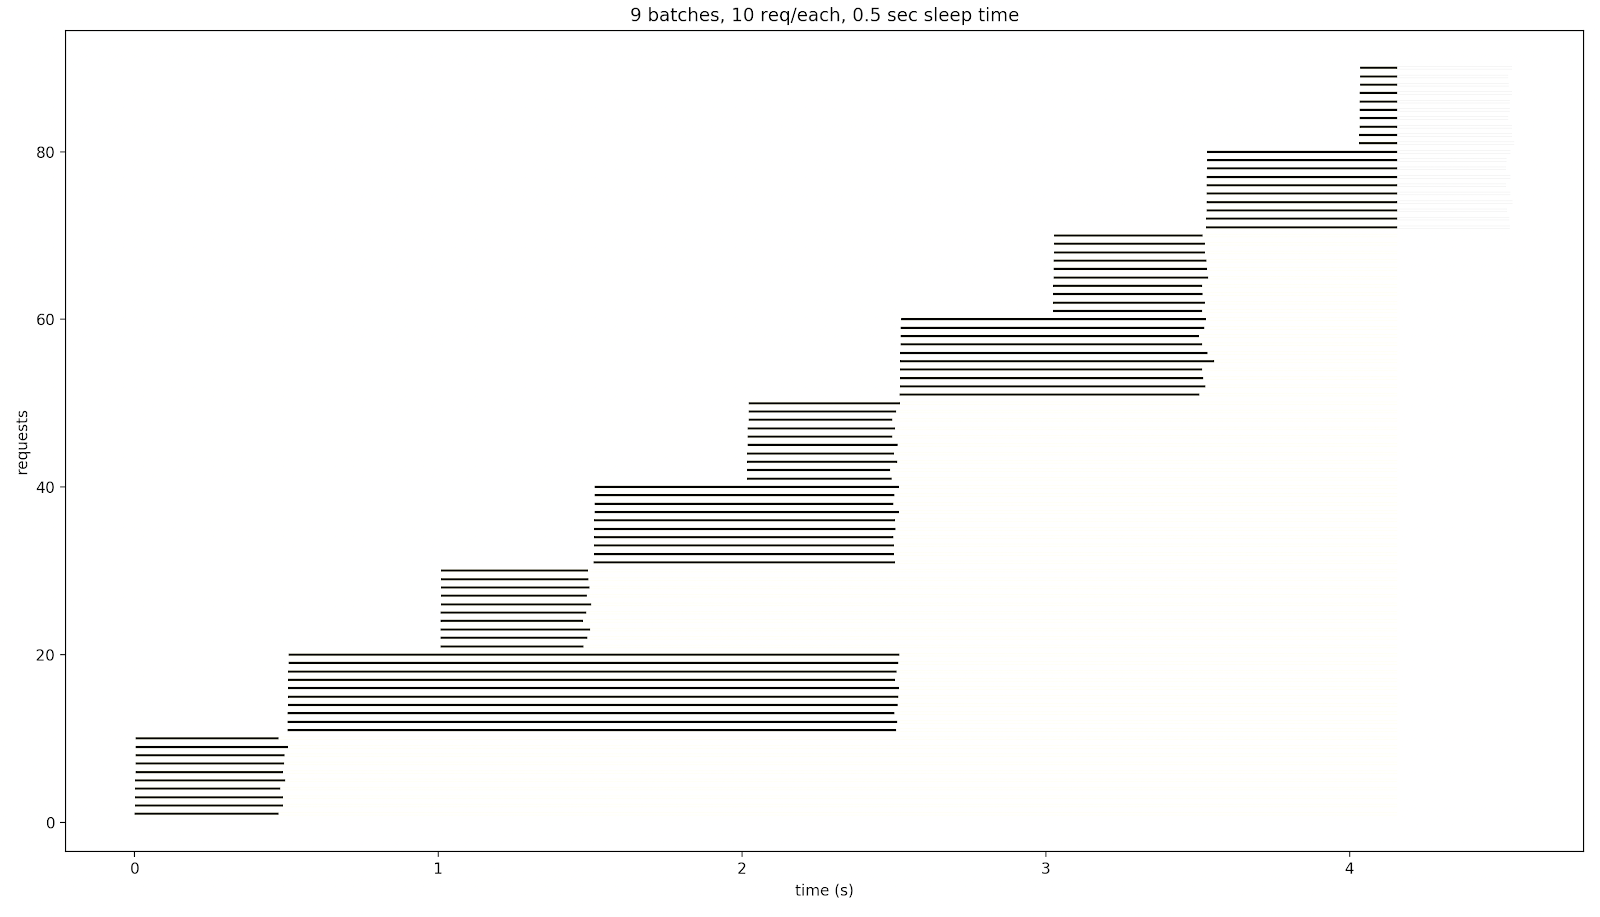
For the 0.5-sec sleep time, the service responds longer:
For the 0.1-sec sleep time, after the 9th batch, the system stopped responding. Those weren’t error responses: they simply hadn’t been received during this 2-second test.
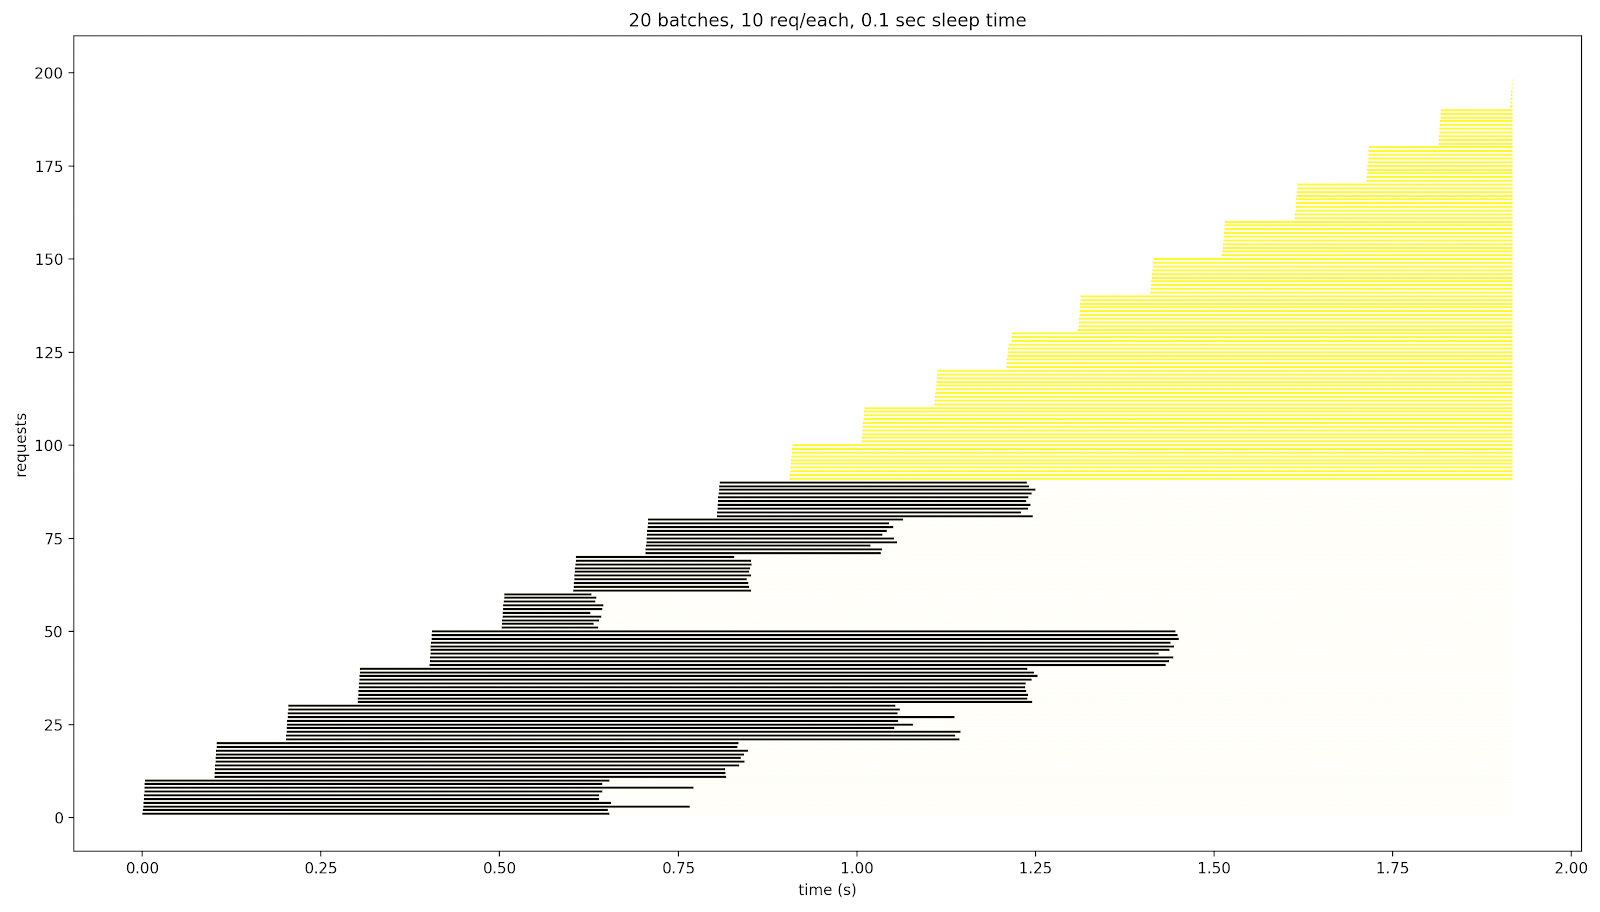
If we increase the number of requests per batch, some responses are displayed in red:
The tool
The code for the tool is available on GitHub: https://github.com/raliev/hybrismart-asyncio-loadgenerator (Thank you, Carlos Martinez, for helping with the script!)
Optional arguments:
| Argument | Description | Default |
|---|---|---|
-h or –help |
show this help message and exit | |
–inputfile INPUTFILE or -i INPUTFILE |
text file with the list of urls | DEFAULT: urls.txt |
–lfrom LFROM, -lf LFROM |
start # of url from the file | DEFAULT: 0 |
–lto LTO, -lt LTO |
end # of url from the file | DEFAULT: 9 |
–wait WAIT, -w WAIT |
waittime between batches | DEFAULT: 3 |
–size SIZE, -s SIZE |
size of the batch | DEFAULT: 10 |
The code
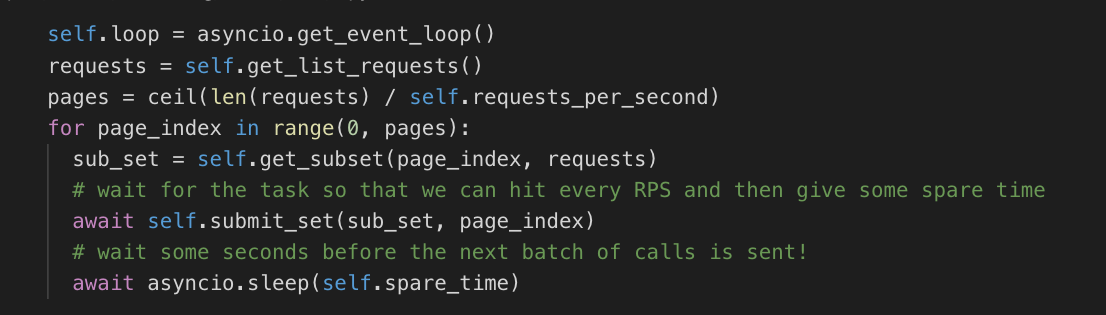
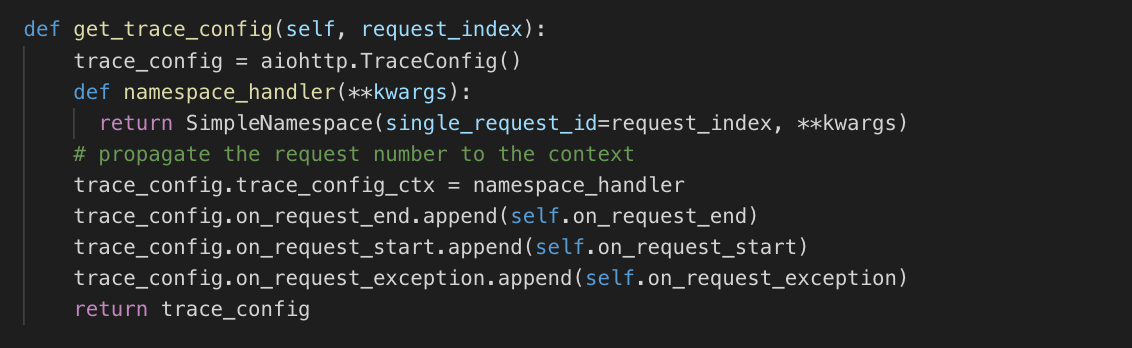
The script starts the tests in batches with the specified size:
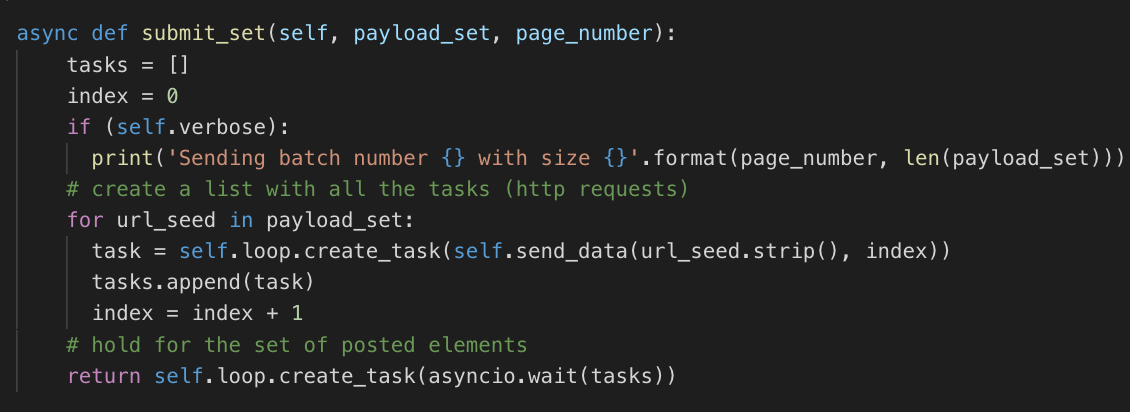
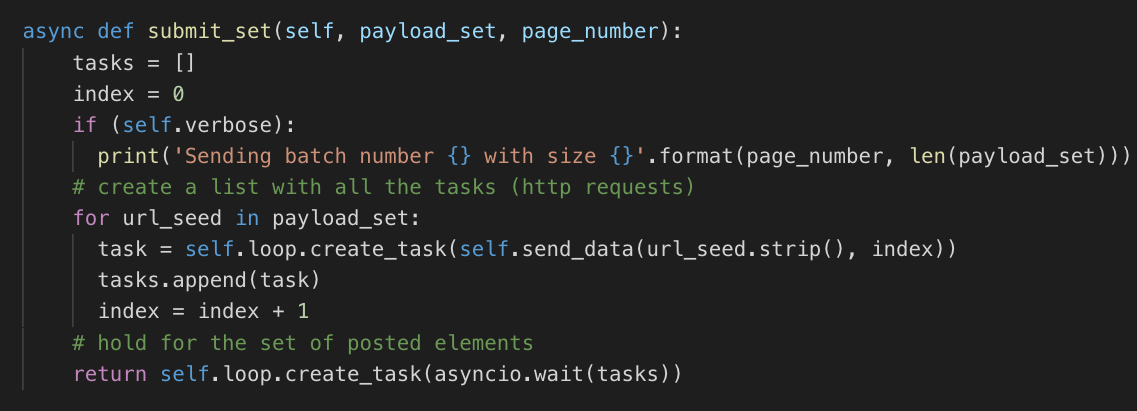
submit_set is an async function sending the group of requests.
send_data performs an asynchronous HTTP call:
trace_configs declares the callbacks to be used to persist the start and end of every single request:
A new class, RequestTrace, was created only to persist the trace for each request (request id, start time, end time).
The three callbacks are then defined as follows:
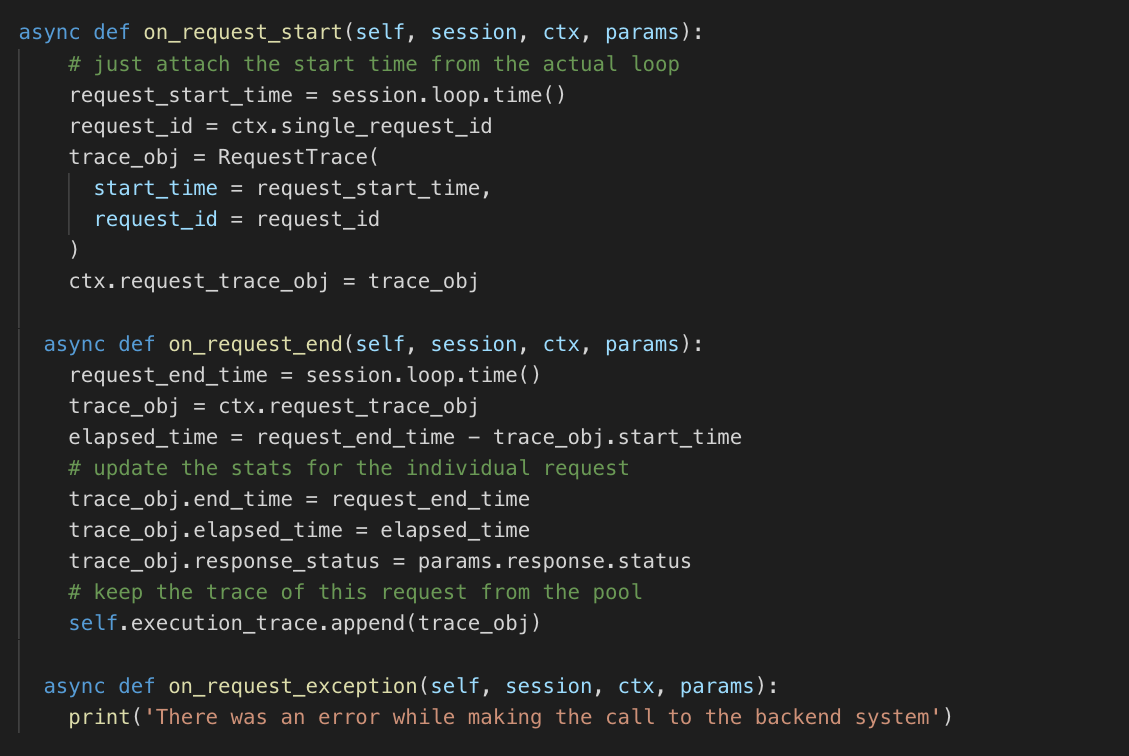
The results are accumulated in execution_trace. This will help us use the data later to persist it in a file so that we can analyze it later; see save_results_to_file:

Integration API (OData) Concurrency Test
Using the script above, I tested the SAP Commerce Cloud Integration API (OData, Item Persistence). This interface can be used for creating/modifying products in the database using the data-driven API.
First, we need to set up the Integration API:
INSERT_UPDATE IntegrationObject; code[unique = true];
; InboundProduct

INSERT_UPDATE IntegrationObjectItem; integrationObject(code)[unique=true] ; code[unique = true] ; type(code)
; InboundProduct   ; Product         ; Product
; InboundProduct   ; Catalog         ; Catalog
; InboundProduct   ; CatalogVersion  ; CatalogVersion
; InboundProduct   ; Unit            ; Unit

INSERT_UPDATE IntegrationObjectItemAttribute; integrationObjectItem(integrationObject(code), code)[unique = true]; attributeName[unique = true]; attributeDescriptor(enclosingType(code), qualifier); returnIntegrationObjectItem(integrationObject(code), code); unique[default = false]
; InboundProduct:Product        ; code            ; Product:code           ;
; InboundProduct:Product        ; catalogVersion  ; Product:catalogVersion ; InboundProduct:CatalogVersion
; InboundProduct:Product        ; name            ; Product:name           ;
; InboundProduct:Product        ; unit            ; Product:unit           ; InboundProduct:Unit
; InboundProduct:Product        ; supercategories ; Product:supercategories; InboundProduct:Category
; InboundProduct:Unit           ; code            ; Unit:code              ;
; InboundProduct:Catalog        ; id              ; Catalog:id             ;
; InboundProduct:CatalogVersion ; catalog         ; CatalogVersion:catalog ; InboundProduct:Catalog
; InboundProduct:CatalogVersion ; version         ; CatalogVersion:version
After that, we need to create two test categories in the Default catalog (Staged):
testCategorytestCategory2
In my setup, the user admin has the password nimda. I manually assigned a new integrationadmingroup to admin.
Create a file “payload” with the following content:
{
  "@odata.context": "$metadata#Products/$entity",
  "code": "test_article1",
  "name": "product description 1",
  "supercategories": [
    {
      "code": "testCategory",
      "catalogVersion": {
        "catalog": {
          "id": "Default"
        },
        "version": "Staged"
      }
    }
  ],
  "catalogVersion": {
    "catalog": {
      "id": "Default"
    },
    "version": "Staged"
  }
}
and then run the call using curl:
curl -k --location --request POST 'https://localhost:9002/odata2webservices/InboundProduct/Products' \
--header 'Content-Type: application/json' \
--header 'Accept: application/json' \
--user admin:nimda \
--data @payload
The result should look like this:
{
  "d": {
    "__metadata": {
      "id": "https://localhost:9002/odata2webservices/InboundProduct/Products('Staged%7CDefault%7Ctest_article1')",
      "uri": "https://localhost:9002/odata2webservices/InboundProduct/Products('Staged%7CDefault%7Ctest_article1')",
      "type": "HybrisCommerceOData.Product"
    },
    "code": "test_article1",
    "name": "product description 1",
    "integrationKey": "Staged|Default|test_article1",
    "unit": {
      "__deferred": {
        "uri": "https://localhost:9002/odata2webservices/InboundProduct/Products('Staged%7CDefault%7Ctest_article1')/unit"
      }
    },
    "supercategories": {
      "__deferred": {
        "uri": "https://localhost:9002/odata2webservices/InboundProduct/Products('Staged%7CDefault%7Ctest_article1')/supercategories"
      }
    },
    "catalogVersion": {
      "__deferred": {
        "uri": "https://localhost:9002/odata2webservices/InboundProduct/Products('Staged%7CDefault%7Ctest_article1')/catalogVersion"
      }
    },
    "localizedAttributes": {
      "__deferred": {
        "uri": "https://localhost:9002/odata2webservices/InboundProduct/Products('Staged%7CDefault%7Ctest_article1')/localizedAttributes"
      }
    }
  }
}
For this test, we will need two payloads:
- One that creates or updates a product test_article1 and assigns it to testCategory.
- Another one that creates or updates a product test_article1 and assigns it to testCategory2.
| Payload 1 | Payload 2 |
|---|---|
{ “@odata.context”: “$metadata#Products/$entity”, “code”: “test_article1”, “name”: “product description 1”, “supercategories”: [ { “code”: “testCategory“, “catalogVersion”: { “catalog”: { “id”: “Default” }, “version”: “Staged” } } ], “catalogVersion”: { “catalog”: { “id”: “Default” }, “version”: “Staged” } } |
{ “@odata.context”: “$metadata#Products/$entity”, “code”: “test_article1”, “name”: “product description 1”, “supercategories”: [ { “code”: “testCategory2“, “catalogVersion”: { “catalog”: { “id”: “Default” }, “version”: “Staged” } } ], “catalogVersion”: { “catalog”: { “id”: “Default” }, “version”: “Staged” } } |
Now we can use our performance testing tool to run a single call, just to test that everything works fine. The code demonstrates how to send a GET request. In our case, we need to send POSTs with different payloads. getJSONPayload returns payload1 or payload2 randomly. endpoint is the same for both payloads (see curl above).
...
async with session.post(endpoint, headers=HEADERS, json=json.loads(getJSONPayload(endpoint)), ssl=True ) as resp:
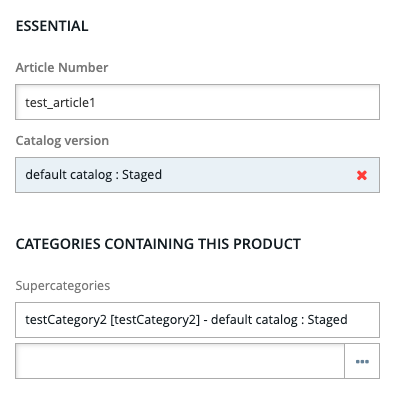
...If the products are created sequentially, one after another, the second update overrides the first one, and we find the product test_article1 assigned to testCategory2.
However, if we remove all assigned categories and then run the script with 25 requests (being sent at nearly the same time), we find the product updated in a strange way:
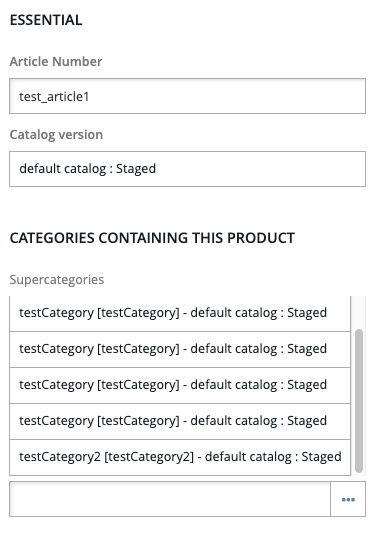
The same testCategory was added many times, with no errors in the log. This is because the items were being added in the parallel threads.